Listen to this article
Alright guys, so today we’re gonna tackle one of the most common Honda codes out there—the dreaded P2646 VTEC code. Now, the thing is, before you go spending a bunch of money on parts, there’s a real simple fix you’re gonna want to try first that costs you absolutely nothing. Basically, we’re gonna clean out some screens that get clogged up with gunk over time, and nine times out of ten, this is what’s causing your problem. I’m gonna walk you through this step-by-step, and we’ll get your Honda running right again without breaking the bank.
Understanding What the P2646 Code Actually Means
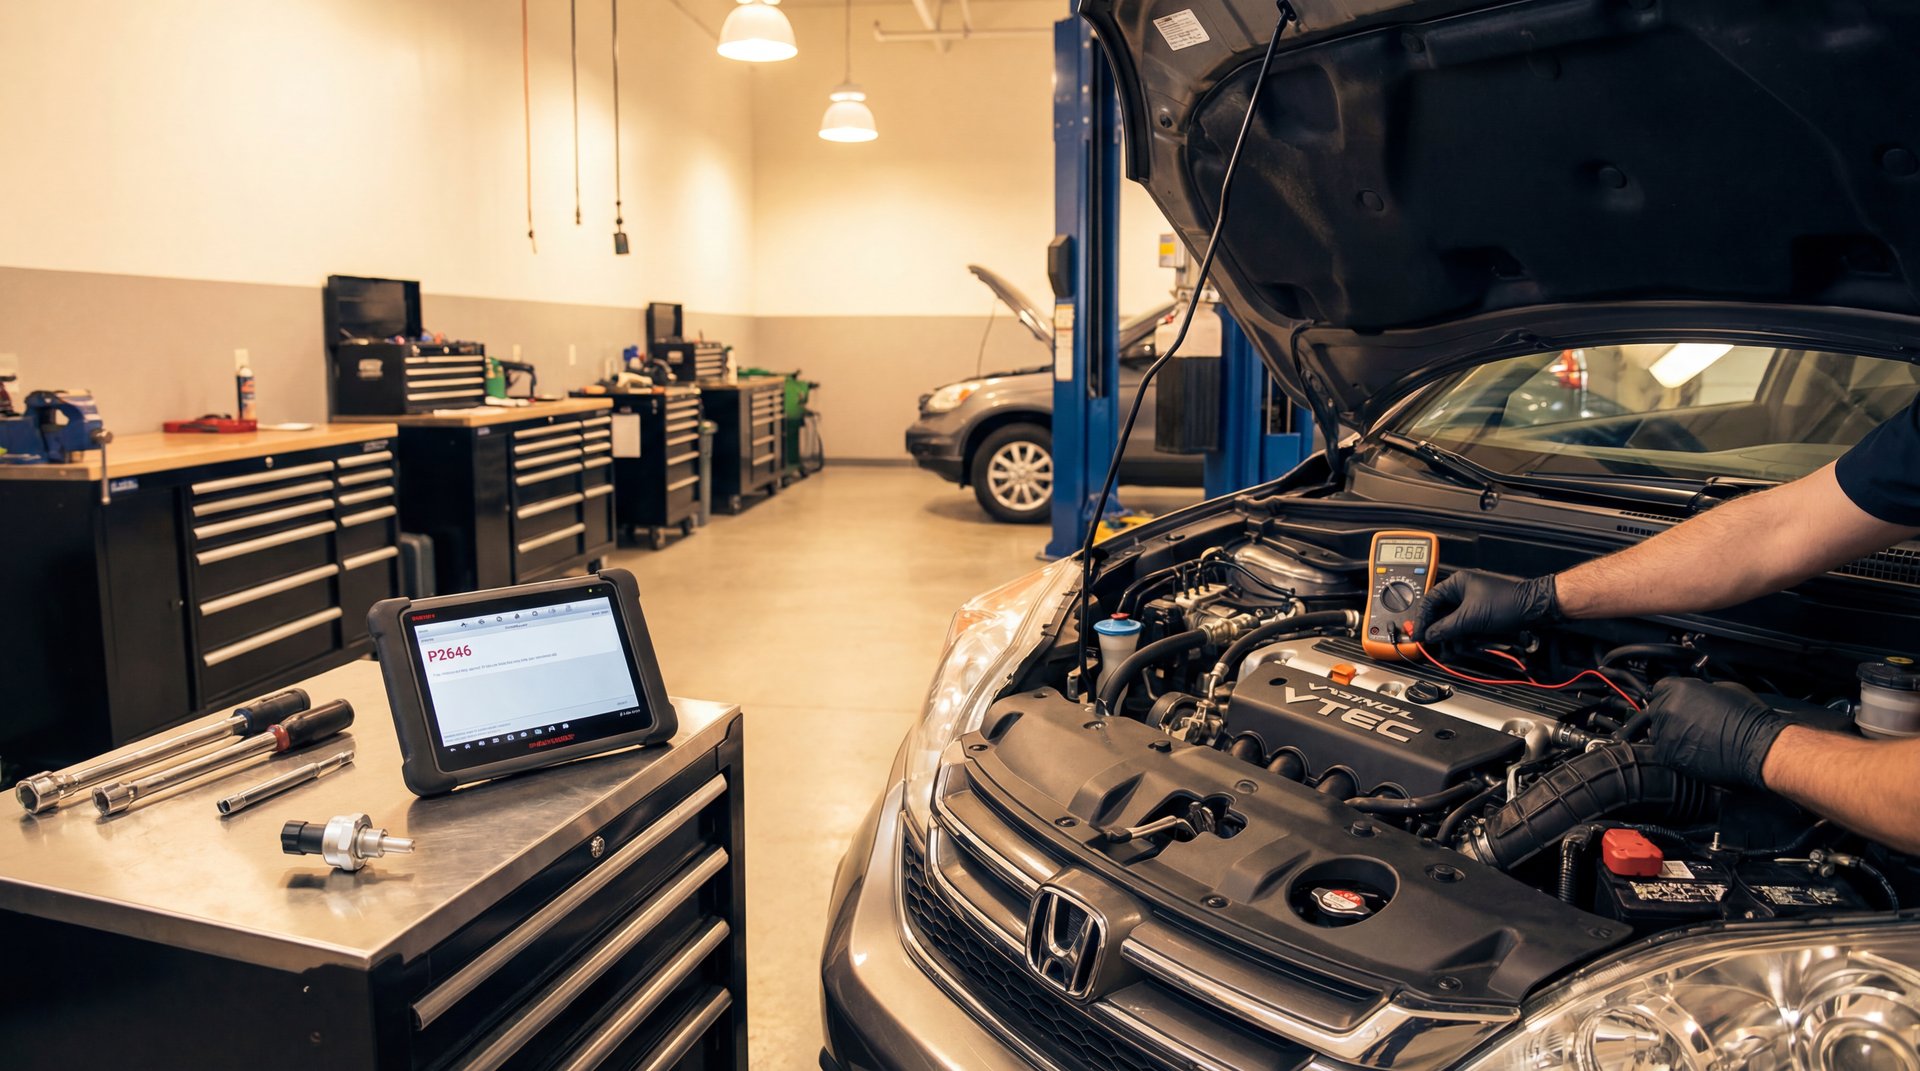
So real quick, let me explain what’s going on when you see that P2646 code pop up on your scanner. What we’re dealing with here is a problem with your VTEC system—which stands for Variable Valve Timing & Lift Electronic Control. Now, Honda’s VTEC system is pretty brilliant actually. Basically, it uses oil pressure to switch between two different camshaft profiles depending on how hard you’re pushing the engine. At low RPMs, you get one cam profile that’s designed for fuel economy and smooth operation. When you get up around 2500-3000 RPMs and you’re getting on it a little bit, the system switches to a more aggressive cam profile that gives you better power and performance.
The way this works is through a solenoid valve—think of it like an electronic switch that controls oil flow. When your engine computer (the PCM) decides it’s time to engage VTEC, it sends a signal to this solenoid, which then directs pressurized engine oil through passages to lock the cam lobes together in the high-performance position. The thing is, this whole system depends on clean oil flowing freely through some pretty small passages and screens. When these screens get clogged up with sludge, carbon deposits, or metal particles, the oil can’t flow properly, and that’s when you get the P2646 code.
⚠️ Warning
If you ignore this code and keep driving, you’re not gonna hurt your engine immediately, but you’ll be stuck in the low-RPM cam profile permanently. That means your engine won’t go past about 3000 RPM, you’ll have terrible acceleration, and your fuel economy will actually get worse because the engine can’t breathe properly at higher loads. Plus, you might start hearing rattling or ticking noises from the valvetrain.
What you’ll notice when this code sets is that your car feels like it’s got no power, especially when you try to accelerate onto the highway or pass someone. The engine will rev up to about 2500-3000 RPMs and then just hit a wall—it won’t go any higher no matter how hard you push the gas pedal. You might also notice the engine runs a little rougher than usual, and obviously that check engine light is gonna be staring at you from the dashboard.
Locating and Accessing the VTEC Solenoid and Filter Screens
Alright, so now we’re gonna get into where these screens are located and how to access them. The good news is this job doesn’t require a ton of disassembly—you’re not pulling the head or anything crazy like that. On most Honda Accords from about 2003 to 2017, and CR-Vs and Civics from similar years, the VTEC solenoid is located on the front of the cylinder head, usually on the driver’s side if you’re looking at the engine from the front of the car.
🔧 Tools Needed
- Socket wrench set (10mm, 12mm most common)
- Torque wrench (for reinstallation)
- Needle nose pliers
- Clean rags or shop towels
- Small oil drain pan
- Carburetor cleaner or brake cleaner
- Safety glasses
- Rubber gloves
- Flashlight or work light
- Small pick or dental tool (optional, for cleaning)
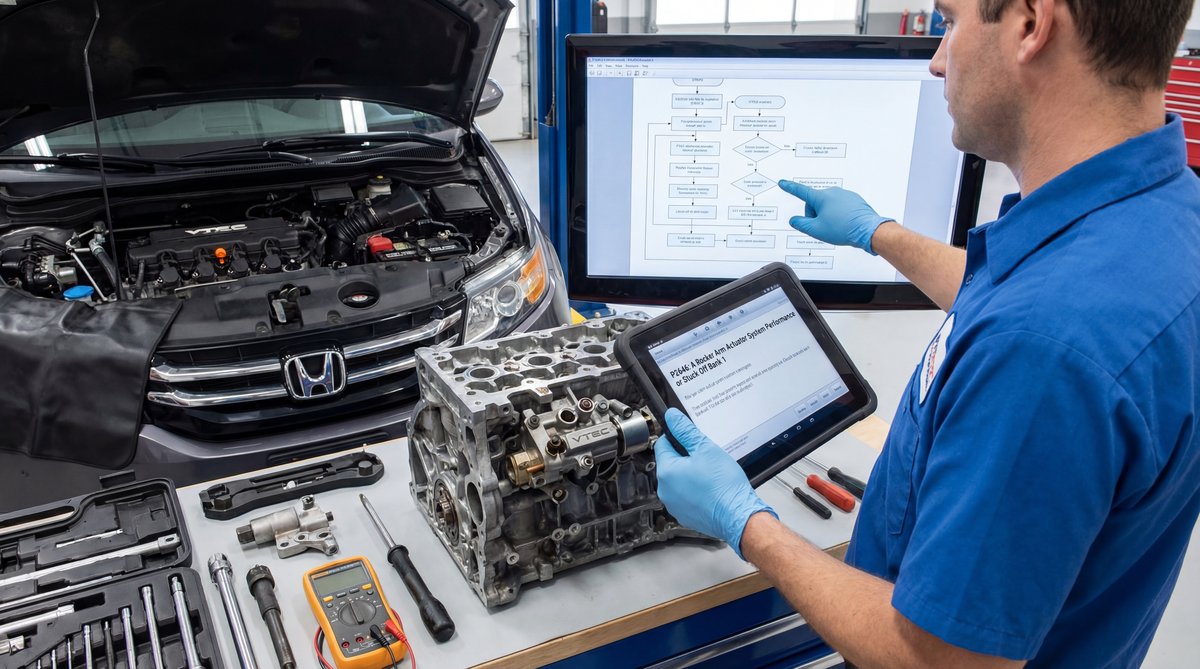
Now, the thing is, there are actually three screens you’re gonna want to check. The first one is inside the VTEC solenoid itself—this is the most common culprit. The second one is on the spool valve assembly, and then there’s a third screen on the front of the engine block that feeds oil to the whole VTEC system. We’re gonna hit all three of these because if you’re already in there, you might as well do the job right and not have to go back in there next month.
Before you start pulling anything apart, make sure your engine is completely cold. I mean stone cold—let it sit overnight if you can. You’re gonna be working with hot oil otherwise, and that’s just not fun. Also, disconnect your negative battery cable. This is an electrical component, and even though the voltage isn’t gonna hurt you, you don’t want to accidentally short something out or trigger another code while you’re working.
🔧 Pro Tip
Before you remove anything, take a few pictures with your phone of how everything is connected. Trust me on this—when you’ve got multiple electrical connectors and you’re trying to remember which one goes where, those pictures are gonna save you a ton of frustration. Also, grab a piece of masking tape and a Sharpie to label any connectors you disconnect.
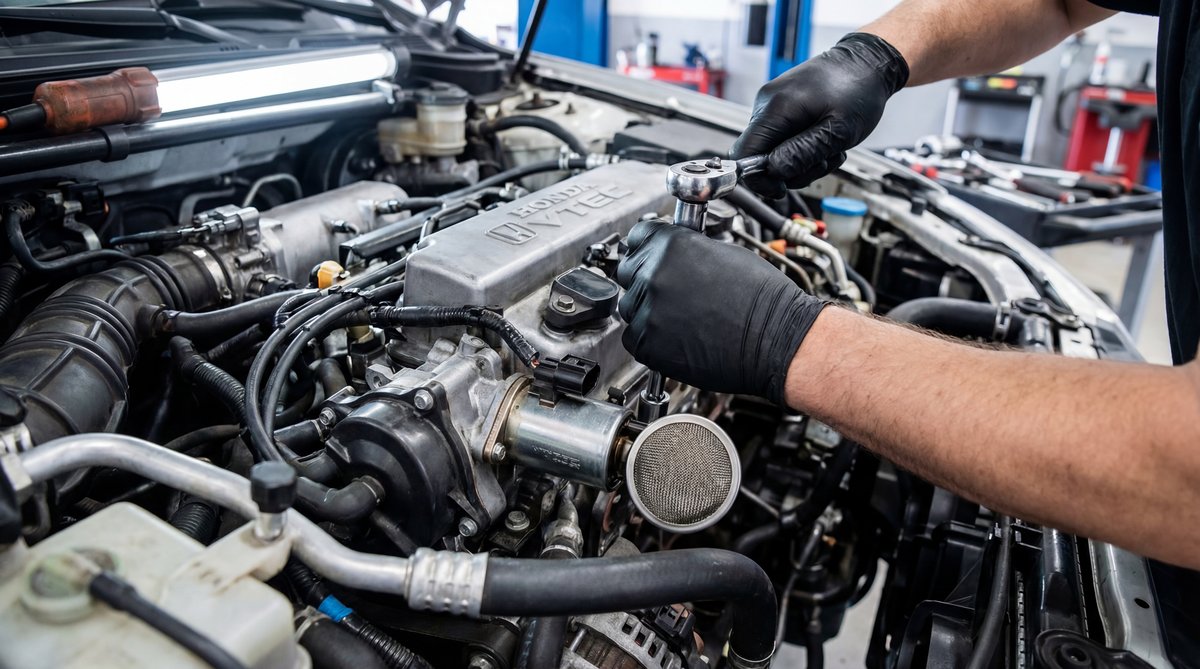
The VTEC solenoid is gonna have an electrical connector plugged into it—usually a three-wire connector with a locking tab. Push down on that tab and wiggle it gently to disconnect it. Don’t just yank on the wires, or you’re gonna be dealing with broken wires on top of everything else. Once the connector is off, you’ll see that the solenoid is held in place by one or two bolts, typically 10mm or 12mm. These bolts usually have a torque spec of somewhere between 4 to 6 foot-pounds when you reinstall them, so you definitely want to use a torque wrench—we’ll talk more about that in a minute.
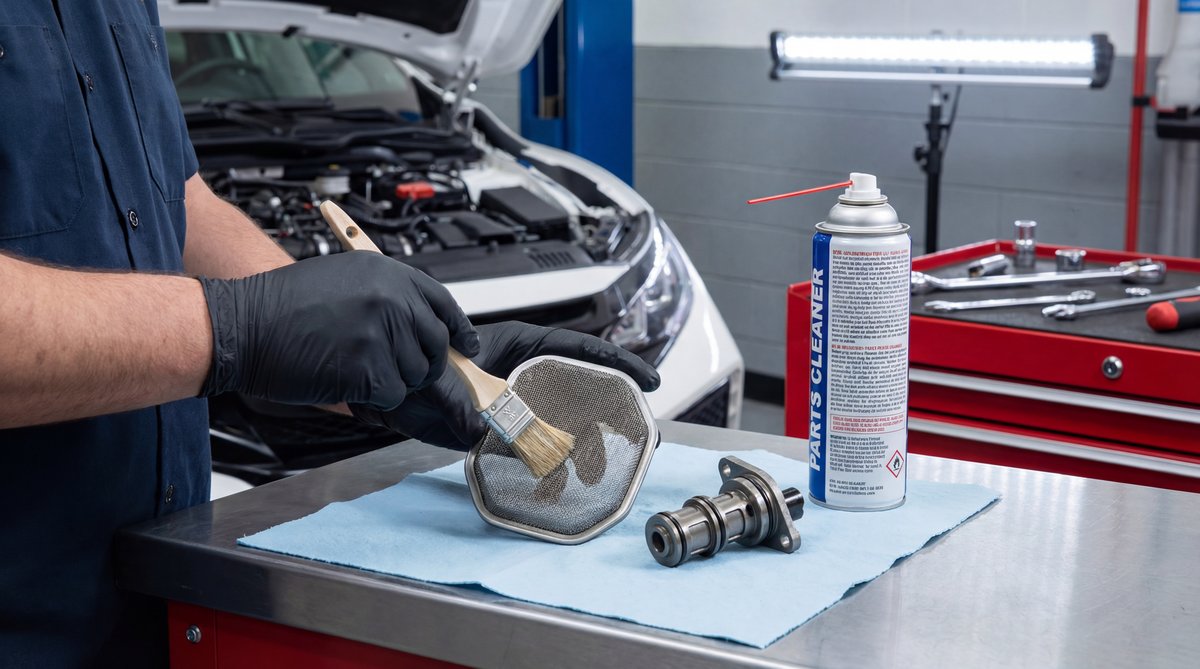
Removing and Cleaning the VTEC Solenoid Screen Filter
Okay, so now we’re getting to the actual cleaning part. Once you’ve got those bolts out, you can pull the VTEC solenoid straight out of the cylinder head. Now, when you pull it out, you’re gonna see oil start to drip out—that’s completely normal. That’s why you’ve got that drain pan sitting under there, right? The solenoid might have a rubber gasket or O-ring on it, and you’re gonna want to inspect that real carefully. If it’s cracked, hard, or looks like it’s been leaking, you’ll need to replace it. The OEM part number for the gasket on most Hondas is gonna be something like 917-269 for the aftermarket Dorman version, or you can get the Honda OEM gasket from the dealer—it’ll cost you maybe five to ten bucks.
Now, flip that solenoid over and look at the end that was inside the engine. You’re gonna see a small cylindrical screen filter—looks kind of like a little metal mesh basket. This is what catches all the crud before it can get into the solenoid valve itself. On a lot of vehicles with this code, this screen is gonna be absolutely packed with black sludge, varnish, and sometimes even metal particles from normal engine wear. Basically, what happens is that over time, especially if oil changes have been neglected or the wrong oil was used, all this gunk builds up and restricts oil flow.
❌ Common Mistake
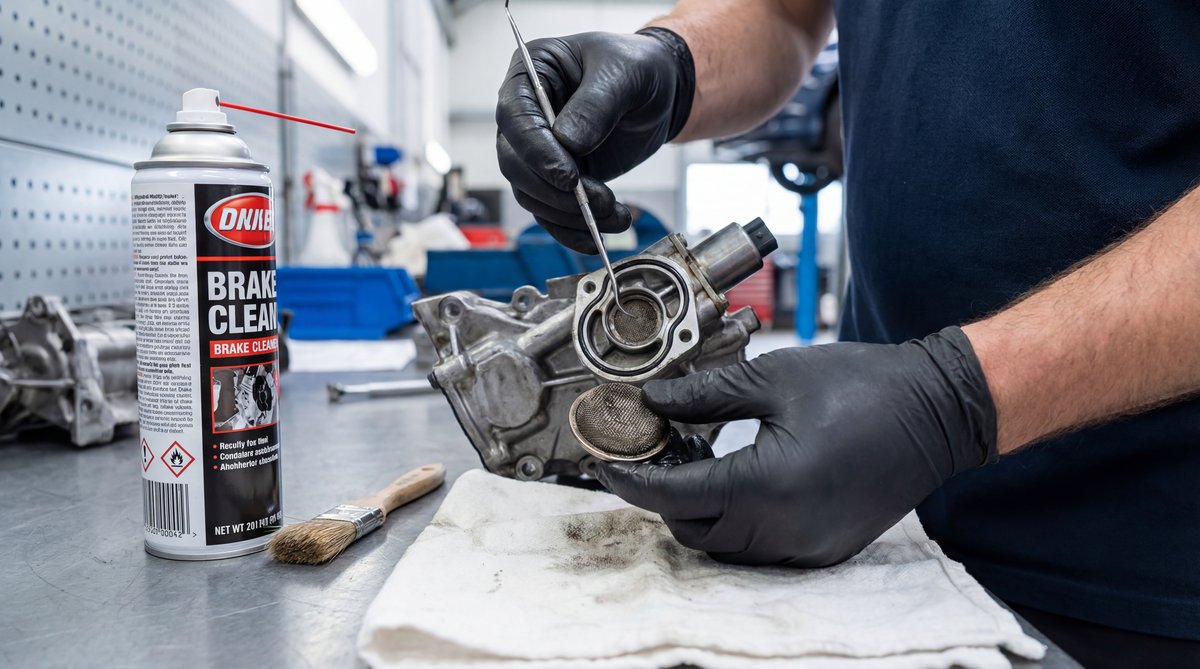
A lot of people try to blow the screen out with compressed air and call it good. The thing is, compressed air might move some loose debris, but it’s not gonna remove the varnish and hard carbon deposits that are really causing the restriction. You need to actually dissolve that stuff with a good cleaner, and you need to scrub it with a small brush or pick to really get it clean.
Here’s what you’re gonna do: spray that screen liberally with carburetor cleaner or brake cleaner. Let it soak for a couple minutes—this gives the cleaner time to break down all that varnish and carbon. Then, use a small brass brush (not steel—you don’t want to damage the screen) or even an old toothbrush to gently scrub the screen. You can also use a dental pick or a small scribe to carefully pick out any stubborn debris from the screen openings. The goal here is to get that screen looking like new—you should be able to see light through all the openings clearly.
Spray it again with cleaner, let it drip dry, and then inspect it one more time with a bright flashlight. If there’s any question about whether it’s clean enough, clean it again. The thing is, you’re already in here doing the work, so you might as well spend an extra five minutes and make sure it’s absolutely spotless. Once you’re satisfied that the screen is clean, set the solenoid aside on a clean rag—you don’t want to contaminate it again before reinstallation.
Nine times out of ten, just cleaning these screens is gonna fix your P2646 code without spending a dime on parts. But you gotta be thorough—halfway clean isn’t gonna cut it.
Cleaning the Spool Valve and Block Screen Filters
Alright, so now that we’ve got the solenoid screen cleaned, we’re gonna tackle the other two screens. The spool valve screen is gonna be right there in the hole where you pulled the solenoid out from. Shine your flashlight in there, and you’ll see another small screen or filter element. This one’s a little trickier to access because it’s recessed into the head, but you can usually reach it with needle nose pliers or a pair of hemostats if you’ve got them.
Carefully grab that screen with your pliers and pull it straight out. Be gentle here—you don’t want to drop it down into the engine, and you definitely don’t want to tear the screen mesh. If it’s really stuck in there, you can spray some penetrating oil around it and let it sit for a few minutes, then try again. Once you’ve got it out, you’re gonna clean it exactly the same way you cleaned the solenoid screen—carburetor cleaner, brass brush, pick out any stubborn debris, and inspect it thoroughly.
Now, the third screen is on the front of the engine block, and this one feeds oil to the entire VTEC system. On most Hondas, this is gonna be a small banjo bolt or a threaded filter housing located on the front of the block, usually down low near the oil pan. You’ll need to remove this bolt or housing—it’s typically a 12mm or 14mm—and inside you’ll find another small screen filter. Same deal here: remove it, inspect it for damage, clean it thoroughly, and set it aside.
🔧 Pro Tip
When you’re removing these screens, pay really close attention to how they’re oriented. Some of them have a specific direction they need to go back in, and if you put them in backwards, the oil won’t flow correctly. Take a picture before you remove each one, or make a little sketch in your notebook so you remember exactly how they came out.
While you’ve got everything apart, this is also a good time to inspect the VTEC solenoid itself for any signs of damage. Look at the plunger mechanism—it should move freely in and out when you push on it with your finger. If it’s stuck or moves really stiffly, that’s a sign that the solenoid itself might be on its way out. In that case, you might want to consider replacing it even if cleaning the screens fixes the code this time. The OEM part numbers you’re looking for are 15810-RAA-A01, 15815-RAA-A01, or 15810-RAA-A03 depending on your specific Honda model—these typically run between $60 and $120 from the dealer, or you can get aftermarket versions for $30 to $60.
Properly Reinstalling Components with Correct Torque Specifications
Alright, so now everything’s clean and you’re ready to put it all back together. This is where a lot of DIYers get into trouble because they either overtighten everything and crack something, or they don’t tighten it enough and end up with oil leaks. The thing is, these VTEC components have very specific torque requirements, and you really need to follow them.
Start with that block screen filter we removed—reinstall it with a new crush washer if it uses a banjo bolt, or make sure the threads are clean and not cross-threaded if it’s a threaded housing. Snug it down firmly, but don’t go crazy with it. Next, reinstall the spool valve screen into the cylinder head bore. Make sure it’s seated properly and oriented correctly based on your picture or notes.
⚠️ Warning
This is critical: the VTEC solenoid bolts need to be torqued to exactly 4 to 6 foot-pounds for most Honda applications. Some models may require 8 to 10 foot-pounds, so check your service manual. These are aluminum threads you’re going into, and if you overtighten these bolts, you WILL strip the threads in the cylinder head, and then you’re looking at a major repair involving a helicoil insert or possibly even a new cylinder head.
Before you reinstall the VTEC solenoid, inspect that O-ring or gasket one more time. If there’s any doubt about its condition, replace it now—they’re cheap insurance against oil leaks. A small leak here might not seem like a big deal, but that leaking oil can drip down onto your exhaust manifold and create a burning oil smell, or worse, it can cause an oil fire if enough accumulates.
Apply a very thin film of clean engine oil to the O-ring—this helps it seal properly and prevents it from tearing during installation. Carefully slide the solenoid back into its bore, making sure it seats fully. You should feel it bottom out gently. If you’re forcing it, stop and figure out why—something’s not aligned correctly. Once it’s seated, thread in the mounting bolts by hand first to make sure they’re not cross-threaded.
| DIY Cost | Shop Cost | You Save |
|---|---|---|
| $0-$15 | $200-$500 | $200-$485 |
Now here’s where you absolutely need to use that torque wrench. Set it to the specified torque value—for most Hondas with VTEC, that’s gonna be right around 4 to 6 foot-pounds, which honestly doesn’t feel like much at all. If your torque wrench doesn’t go that low (a lot of the cheaper ones bottom out at 10 foot-pounds), you might need to use an inch-pound wrench instead and convert the spec—4 to 6 foot-pounds equals 48 to 72 inch-pounds. Tighten the bolts in a crossing pattern if there are two, or evenly if there’s just one, until you feel the torque wrench click. Don’t keep tightening after the click—that’s the whole point of using the torque wrench.
Reconnect the electrical connector to the solenoid—you should hear or feel it click into place. Give it a gentle tug to make sure it’s locked on there. Reconnect your battery, and before you start the engine, turn the key to the “on” position (but don’t start it) and let the fuel pump prime for a few seconds. This helps build up oil pressure in the system.
Testing the Repair and Clearing the Diagnostic Code
Okay, so everything’s back together and you’re ready to fire it up. Start the engine and let it idle for a minute while you watch for any oil leaks around the VTEC solenoid. If you see oil seeping out, shut it down immediately and check your O-ring installation. Assuming everything’s dry, the next step is to clear that P2646 code from the engine computer.
You can do this a couple different ways. If you’ve got a code reader or scan tool, just connect it, navigate to the “clear codes” function, and clear them out. The check engine light should go off immediately. If you don’t have a scan tool, you can also clear the codes by disconnecting the battery negative cable for about 10 minutes—this forces the computer to reset and clear its memory. Just be aware that doing it this way will also clear any radio presets and potentially your radio security code, so have that information handy if your Honda has that system.
🔧 Pro Tip
After clearing the code, don’t just assume you’re good to go. Take the car for a good 15-20 minute test drive, and make sure you get the engine up to operating temperature and actually get into the VTEC range—that means accelerating hard enough to get past 3000 RPM. This forces the system to actually engage and tests whether your repair worked. If the code’s gonna come back, it’ll usually set within the first couple drive cycles.
During your test drive, you should notice a significant difference in how the engine performs. When you accelerate and hit that 2500-3000 RPM range where VTEC normally engages, you should feel a subtle but noticeable increase in power—that’s the system switching to the high-performance cam profile. The engine should rev freely all the way to redline now, with no flat spots or hesitation. If you’re still getting that dead feeling around 3000 RPM, or if the check engine light comes back on during your test drive, then we’ve got more investigating to do.
If the code comes back immediately, there are a few possibilities. First, you might have missed cleaning one of the screens thoroughly enough, or there could be additional blockage in the oil passages leading to the VTEC system. Second, the solenoid itself might be faulty internally—cleaning the screens won’t fix a solenoid that has internal electrical or mechanical damage. Third, you could have a wiring problem between the solenoid and the computer. And fourth, though this is less common, you might actually have mechanical wear in the VTEC mechanism itself inside the cylinder head.
💰 Money Saver
If you determine that you do need a new VTEC solenoid after cleaning doesn’t fix the problem, consider buying an OEM Honda part from an online Honda parts dealer rather than going to the dealer in person. You can often find genuine Honda parts for 30-40% less online, and they’re the exact same part with the same warranty. Just make sure you’re getting it from a reputable seller and not a sketchy third-party marketplace.
Assuming your test drive goes well and the light stays off, you’re still not quite done yet. You’ll want to monitor the car for the next week or so, paying attention to how it drives and whether that check engine light comes back on. Drive it normally, drive it hard, and drive it in stop-and-go traffic—basically put it through all the scenarios where the VTEC system would be cycling on and off. If you make it through a week with no codes and good performance, congratulations—you just fixed your P2646 code for the cost of a can of cleaner and an hour of your time.
Preventive Maintenance to Avoid Future VTEC Problems
Alright guys, so now that you’ve fixed your P2646 code, let’s talk about how to keep it from coming back. The thing is, the root cause of clogged VTEC screens is almost always related to poor oil maintenance. Honda’s VTEC system is incredibly reliable when it’s properly maintained, but it’s also very sensitive to oil quality and cleanliness because it relies on precise hydraulic operation through small passages.
First and most important: follow Honda’s oil change intervals religiously, and honestly, I’d recommend changing your oil even more frequently than Honda specifies, especially if you do a lot of short trips or city driving. Honda typically recommends oil changes every 5,000 to 7,500 miles depending on the model and driving conditions, but if you’re serious about keeping your VTEC system happy, consider doing it every 3,000 to 5,000 miles. Yeah, I know that’s more frequent than the manual says, but the thing is, modern oils break down and get contaminated with fuel, moisture, and combustion byproducts, and all that stuff ends up as sludge in your VTEC screens.
Use the correct oil specification—for most Honda VTEC engines, that’s gonna be 0W-20 or 5W-20 synthetic oil. Don’t cheap out here and use conventional oil or the wrong viscosity just because it’s on sale. The VTEC system is designed around specific oil flow characteristics, and using the wrong oil can cause delayed engagement, increased wear, and yes, clogged screens. The extra few bucks you spend on quality synthetic oil is way cheaper than dealing with VTEC problems or engine damage down the road.
The single best thing you can do to prevent VTEC codes is to stay on top of your oil changes with quality synthetic oil. It’s not exciting, it’s not fancy, but it works.
Consider using a high-quality oil filter too. Honda OEM filters are good, but there are also excellent aftermarket options from companies like Mobil 1, Purolator, and Wix that have better filtration and flow characteristics. A good oil filter catches more of the microscopic particles that eventually turn into the sludge that clogs your VTEC screens. Spend the extra five bucks on a better filter—it’s worth it.
If your Honda has higher mileage—say over 100,000 miles—you might want to consider using an engine flush product or a high-quality engine cleaner additive every couple oil changes. These products help dissolve and suspend existing deposits so they can be drained out with the old oil. Just follow the directions carefully and make sure you’re using a product that’s safe for Honda engines with VTEC systems. Some of the really aggressive flush products can actually damage seals and cause leaks, so do your research.
Another thing a lot of people don’t realize is that your driving habits actually affect