
Alright guys, so I came across something today that made me do a double-take. We’re talking about a Ferrari—or at least what’s supposed to be a Ferrari—rolling around with 10-inch wheel spacers. Yeah, you heard that right. Ten. Inch. Spacers. Now, I’ve seen some questionable modifications in my time, but this one takes the cake. There’s definitely something wrong with this picture, and honestly, I don’t know if I’ve ever seen 10-inch wheel spacers on a Ferrari. The thing is, this whole setup raises a lot of red flags about what’s really going on with this car.
The Pontiac Fiero “Ferrari” Mystery
So let me break down what’s really going on here. When you see a “Ferrari” with 10-inch wheel spacers, you’re probably not looking at a real Ferrari at all. What we’re gonna do is talk about one of the most common Ferrari replicas out there—the Pontiac Fiero conversion. Basically, these were popular back in the day because the Fiero had a mid-engine layout similar to actual Ferraris, and people would slap body kits on them to make them look like the real deal.
The problem? The Fiero’s track width and wheel fitment are nowhere close to a real Ferrari’s. So when someone tries to make those wheels sit wider to look more aggressive or “authentic,” they end up with absolutely ridiculous wheel spacers. And I mean ridiculous. We’re talking about spacers that push the wheels so far out they’re basically in the next zip code.
❌ Common Mistake
A lot of people think bigger wheel spacers automatically make their car look more aggressive and performance-oriented. The reality is that excessive spacers destroy your suspension geometry, overload your wheel bearings, and create serious safety hazards. If you need more than an inch or two of spacing, something else is wrong with your setup.
What Wheel Spacers Actually Look Like on Performance Cars
Alright, let’s talk about what’s normal when it comes to wheel spacers on actual performance cars. According to reputable wheel spacer manufacturers, typical spacers for cars like Ferrari range from about 5mm to 25mm—that’s roughly 0.2 to 1 inch. Real quick, let me put that in perspective: we’re talking about subtle adjustments here, not launching your wheels into orbit.
These small spacers serve a legitimate purpose. They help you clear brake calipers, fine-tune your track width for better handling, or make aftermarket wheels fit properly. But here’s the thing—Ferrari engineers already designed these cars with pretty much perfect geometry. You’re not gonna need much more than a quarter-inch to half-inch spacer in most cases, and even that’s only if you’re running non-OEM wheels.
When you jump to 10 inches, you’re not adjusting anything—you’re completely redesigning how the suspension works. And not in a good way. The wheels are gonna stick out way past the fenders, the suspension components are gonna be under stress they were never designed for, and your wheel bearings are basically screaming for mercy every time you drive.
There’s definitely something wrong with this picture. I don’t know if I’ve ever seen 10-inch wheel spacers on a Ferrari.
Why 10-Inch Spacers Are Dangerously Excessive
Now we need to talk safety, because this isn’t just about looking silly—this is legitimately dangerous. When you install wheel spacers that are this thick, you’re fundamentally changing how forces are transmitted through your suspension and wheel bearings.
Basically, your wheel bearings are designed to handle loads in specific directions. When you move the wheel 10 inches further away from the hub, you’re creating a massive lever arm. Every bump, every turn, every bit of braking force gets amplified through that extended distance. What your bearings could handle easily with normal wheel placement becomes exponentially harder when you’re working with that kind of spacing.
⚠️ Warning
Excessive wheel spacers can cause wheel bearing failure, suspension component damage, loss of steering precision, and in extreme cases, complete wheel detachment while driving. Never use spacers thicker than manufacturer recommendations. If you’re considering spacers over 1 inch thick, you need to seriously reconsider your wheel choice instead.
The steering is gonna feel sloppy and imprecise. Your turning radius changes. The suspension geometry gets completely thrown off—we’re talking about camber, caster, scrub radius, all of it. And here’s what really keeps me up at night: the wheel studs or bolts are now supporting the wheel through this massive spacer, and if any of that hardware fails or works loose, you’re looking at a wheel coming off at speed.
I’ve seen wheels come off cars before, and it’s not pretty. It’s not something you want to experience, and it’s definitely not something you want to inflict on other drivers around you. That’s why you’ll never see legitimate spacer manufacturers offering anything close to 10-inch spacers—because they know it’s unsafe.
How to Properly Install Wheel Spacers (The Right Way)
Alright, so let’s say you actually need wheel spacers—the right size, for legitimate reasons. What we’re gonna do is walk through how to install them properly, because even small spacers can cause problems if you don’t do it right.
🔧 Tools Needed
- Torque wrench (capable of 85-120 ft-lbs)
- Jack and jack stands rated for your vehicle
- Wire brush or Roloc disc
- Anti-seize lubricant
- Extended wheel bolts (usually come with quality spacers)
- Wheel chocks
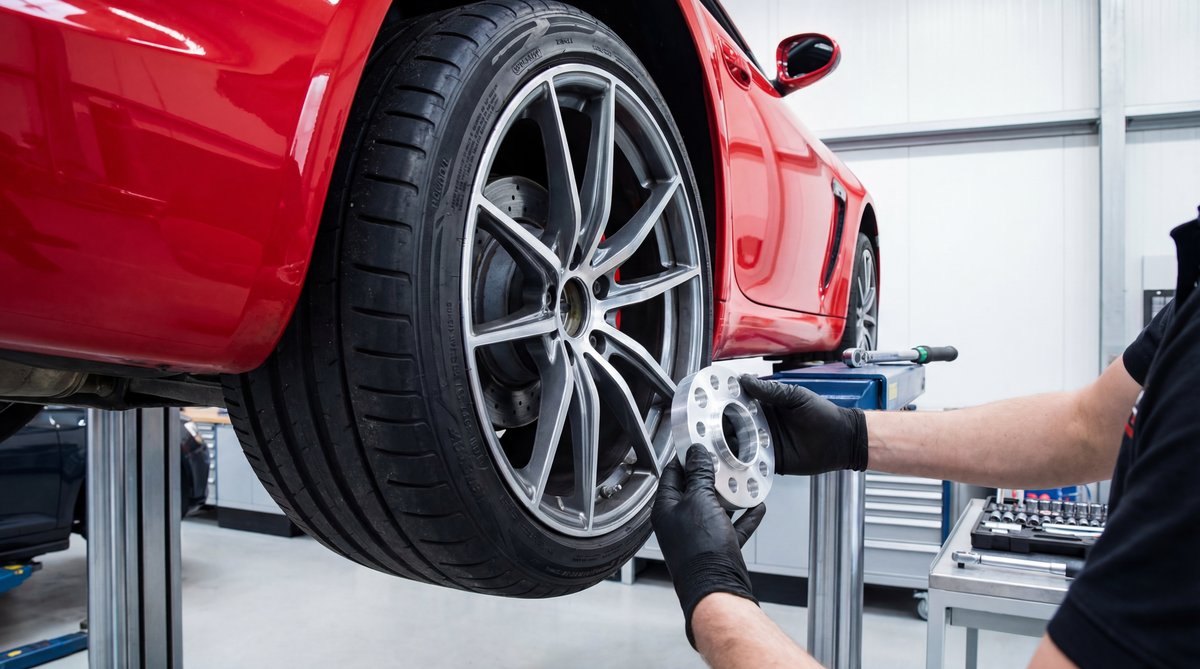
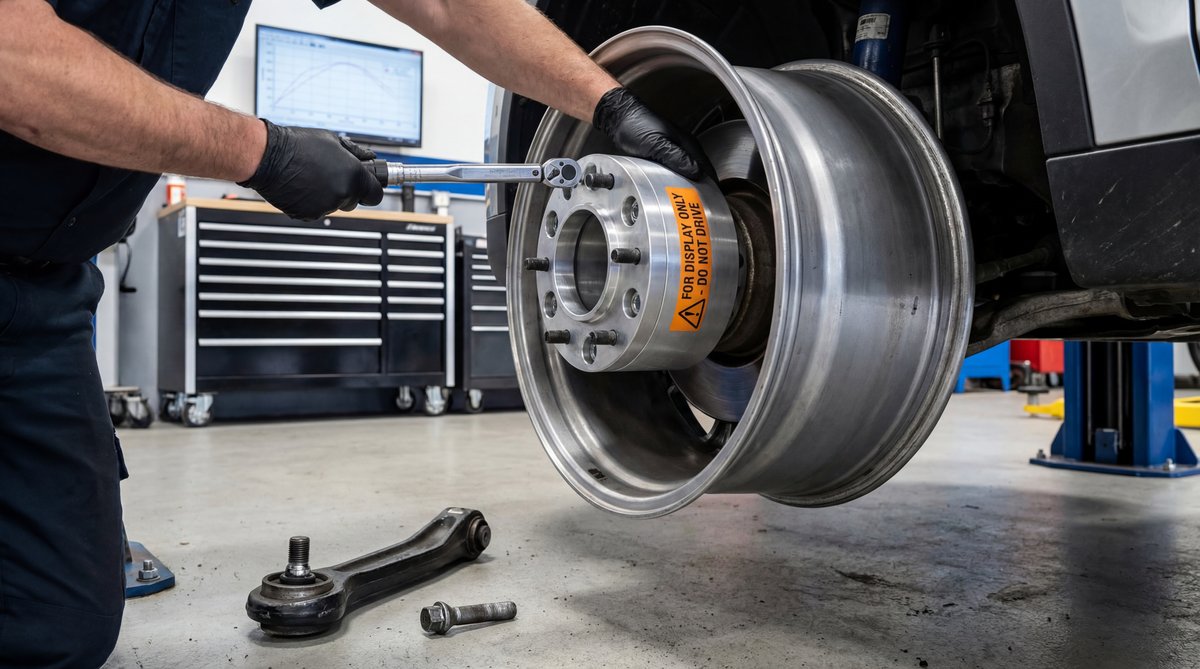
First thing you need to know is that you absolutely must clean the mating surfaces. I mean really clean them. Any rust, dirt, or debris between the hub and the spacer, or between the spacer and the wheel, is gonna cause problems. Use a wire brush or a Roloc disc to get those surfaces perfectly clean and flat.
Real quick—make sure your spacers are hub-centric, not lug-centric. Hub-centric spacers have a raised lip that centers on your hub, just like your wheel normally would. This is critical for proper weight distribution and vibration-free operation. The lugs are just there to hold things tight—they shouldn’t be doing the centering work.
🔧 Pro Tip
Before you tighten anything down, do a test fit. Spin the wheel by hand and check for any wobble or interference with brake components or suspension parts. It’s way easier to catch problems now than after you’ve torqued everything down and taken it for a drive.
Now for torque specs. According to most aftermarket spacer manufacturers, you’re looking at around 85-90 ft-lbs for the spacer hardware. But here’s the thing—Ferrari OEM specs can vary depending on the model, usually running between 100-120 Nm (that’s about 74-89 ft-lbs). Always follow the torque specifications that came with your specific spacers and your vehicle’s manual.
Install the spacers first, torquing them to spec in a star pattern. Then install your wheels using the extended bolts that came with your spacers. Standard wheel bolts won’t be long enough to engage properly through the spacer. Torque those in a star pattern too, and then—and this is important—drive the car for about 50 miles and re-torque everything. Spacers can settle in during the first few drives, and you want to make sure everything stays tight.
After installing spacers, you might be wondering about alignment. Most experts agree that hub-centric spacers don’t directly change your alignment angles, but it’s still a good idea to get an alignment check. The increased track width can make existing alignment issues more noticeable, and you want to make sure everything is dialed in properly.
The Real Cost of Quality Wheel Spacers
Let’s talk money for a minute, because the price difference between quality spacers and cheap garbage is huge—and so is the safety difference.
| DIY Cost | Shop Cost | You Save |
|---|---|---|
| $150-$400 | $400-$700 | $200-$300 |
Quality wheel spacers from reputable manufacturers are gonna run you anywhere from $150 to $400 for a set. Yeah, you can find cheap spacers online for under $50, but those are the ones that fail and cause catastrophic problems. Basically, you’re betting your life and the lives of everyone around you on saving a hundred bucks. Not worth it.
If you go to a shop to have them installed, you’re looking at about $100-150 per hour in labor, and the job usually takes 1-2 hours depending on how thorough they are with the cleaning and torquing process. The thing is, professional installation ensures everything is done right—surfaces are properly cleaned, torque specs are exact, and they’ll usually check for any clearance issues before you drive off.
💰 Money Saver
If you’re gonna DIY this, consider renting a torque wrench from an auto parts store instead of buying one. Most places charge $20-40 for a rental, versus $100+ to buy a quality torque wrench. Just make sure you get one that covers the range you need (85-120 ft-lbs for most wheel work).
Real quick on where to buy: stick with authorized dealers or specialty retailers like established spacer specialists. They’ll make sure you get the right bolt pattern, hub diameter, and thickness for your specific vehicle. Don’t just order whatever looks close on eBay—wheel fitment is too critical to guess at.
Frequently Asked Questions
What are the potential risks of using 10-inch wheel spacers on a Ferrari?
Alright, so 10-inch wheel spacers are basically a disaster waiting to happen. You’re gonna overload your wheel bearings to the point of failure, completely screw up your suspension geometry, lose steering precision, and massively increase the risk of wheel detachment. The suspension components were never designed to handle loads at that distance from the hub. Honestly, if you see a car with 10-inch spacers, it’s either not what it claims to be (like a Fiero pretending to be a Ferrari) or someone made some seriously questionable decisions. No legitimate manufacturer makes spacers this thick because they know it’s unsafe.
How do I properly clean and prepare the wheel and hub for spacers?
Real quick on this—surface prep is critical. First, get the wheel off and use a wire brush or Roloc disc to clean the hub face completely. You want to remove all rust, dirt, brake dust, and any corrosion. The surface needs to be flat and clean. Then do the same thing where the spacer meets the wheel—clean that mounting surface thoroughly. Any debris or uneven surface is gonna cause vibration and potentially dangerous runout. Once everything is clean, apply a thin coat of anti-seize to the hub and bolt threads. The thing is, even a tiny bit of crud between surfaces can throw everything off, so don’t skip this step.
What torque specifications are recommended for installing wheel spacers?
Torque specs are gonna vary depending on your specific vehicle and spacers. Basically, most aftermarket spacers call for 85-90 ft-lbs on the spacer hardware itself. For Ferrari models, OEM wheel bolt torque is usually between 100-120 Nm, which works out to about 74-89 ft-lbs. But here’s what you need to do—always follow the specifications that came with your spacers and check your vehicle’s manual. Use a torque wrench and tighten in a star pattern to ensure even clamping force. After about 50 miles of driving, re-torque everything to make sure nothing has settled or loosened up.
Are there any specific safety precautions I should take when installing wheel spacers?
Absolutely. First off, make sure you’re using jack stands rated for your vehicle’s weight—never trust just a jack. Use wheel chocks on the wheels that are still on the ground. Wear eye protection when cleaning hub surfaces with a wire wheel. Only use hub-centric spacers that are specifically designed for your vehicle’s bolt pattern and hub diameter. Never mix spacer types or use non-hub-centric spacers. Make sure you have the extended wheel bolts that are designed to work with your spacer thickness—standard bolts won’t engage enough threads and that’s dangerous. And basically, if you’re not comfortable with any part of this process, take it to a professional. This isn’t the place to learn on the job.
How do I know if I need an alignment after installing wheel spacers?
So here’s the thing—hub-centric spacers don’t actually change your alignment angles directly, but they can make existing issues way more noticeable. What we’re gonna do is recommend getting an alignment check after installing spacers, especially if you notice any pulling to one side, uneven tire wear, or if the steering feels off-center. The increased track width from the spacers can amplify any alignment problems you already had. If your car pulls, vibrates, or the steering wheel isn’t centered when driving straight, get it checked out immediately. Better safe than sorry, and an alignment check is way cheaper than replacing tires or suspension components that wore out prematurely.
