
How to Restore Plastic Headlights
The ultimate guide to Headlight Restoration without using Clear Coat. This video will show you how to restore your oxidized plastic headlights so they will never fade, yellow, fog, or turn hazy again!
Other youtube videos do not work! To restore your headlight permanently you should use this method. You will just be wasting your time and effort using bug spray, toothpaste, or baking soda. And you will end up ruining your headlamp if you op to put a clear coat on them. This is the only right way to restore your headlamps despite all the other so-called permanent fixes.
Things you will need to restore your headlights
500 grit sandpaper: http://amzn.to/2GD0rLM
800 grit sandpaper: http://amzn.to/2plunnl
3000 grit sandpaper: http://amzn.to/2FKEoWk
Lens and Hard plastic cleaner: http://amzn.to/2HGUY5M
Lens polish and protector: http://amzn.to/2plv3cn
3m headlamp restoration kit for businesses: http://amzn.to/2DzNeAe We charge 125$ per vehicle and this kit has paid itself off many times over.
How to Restore Headlights
The ultimate headlight restoration video in this video, I’ll show you how to restore your headlights to like-new condition using a
three step process with sandpaper and polish.
Be sure to watch the end of the video because there are some tips you’re not going to want to miss I will keep your
headlights looking like new for the lifetime of your vehicle.
To get the oxidation off these headlights we’re going to be using three different grits of sandpaper to sand down any oxidation we’re gonna start with a 500 grit.
I’m gonna be using a DA just to speed up the process that just velcro’s on this power sander we’re gonna go from 500 to 800 grit and then to a final polish with a 3,000 grit sandpaper.
Any sandpaper will work it doesn’t have to be these round discs with the velcro. You can also do this by hand it works. Just as well
I’ve done it both ways.
I’ve done this process several times. When we’re done I’m gonna use a lens and hard plastic cleaner to buff out the headlight and then I’m going to use a lens and polished protector
Protecting around The Headlight
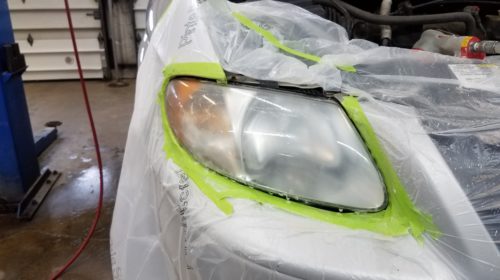
I’m gonna start by taping out the area just to protect any paint from the sandpaper
these headlights
I’m just gonna lay plastic over the top of these headlights and then I’m going to take a razor blade and I’m gonna cut on top of the tape that way you don’t cut into the paint. Once we get around the headlight cutout I’m just going to take more masking tape and take the plastic down
Sanding The Headlights With Sandpaper
Alright, so we’re gonna start with a 500 grit sandpaper. You can do this by hand or with a power sander. I have an air sander here that I’m using, 3m Palm Sander
And take some water we’re gonna want to do this all wet sanding. It just helps keep the sandpaper clear or last long and it cuts into the plastic a little better.
So we’re just gonna go over this thoroughly with a 500 grit sandpaper until you’re sure you have all the area covered evenly. As you do this you can see all the oxidation lifting off of the headlights. Then we’re gonna move on to the 800 grit sandpaper and do the same process. Then from 800 grit we’re gonna go on to the 3000 grit and you’re probably gonna want to spend the most time on the 3000 grit cuz this ensures you get all the scratches out from the 500 and the 800 grit sandpaper out of the headlights. It’s gonna ensure a nice smooth finish.
Basically, all this sanding is doing is just removing that top layer of oxidation all that haze headlight hazing you know the fogging in the headlights. All the sanding is gonna get rid of all that out of that top plastic layer?
How to Polishing the Headlights
Now before we start polishing we’re just gonna wipe them dry with a rag or some paper towel. Now that we got the headlight all dry we’re gonna apply the lens and polish protector.
If you use the 3000 grit long enough, it actually makes for less work when it comes to buffing them out.
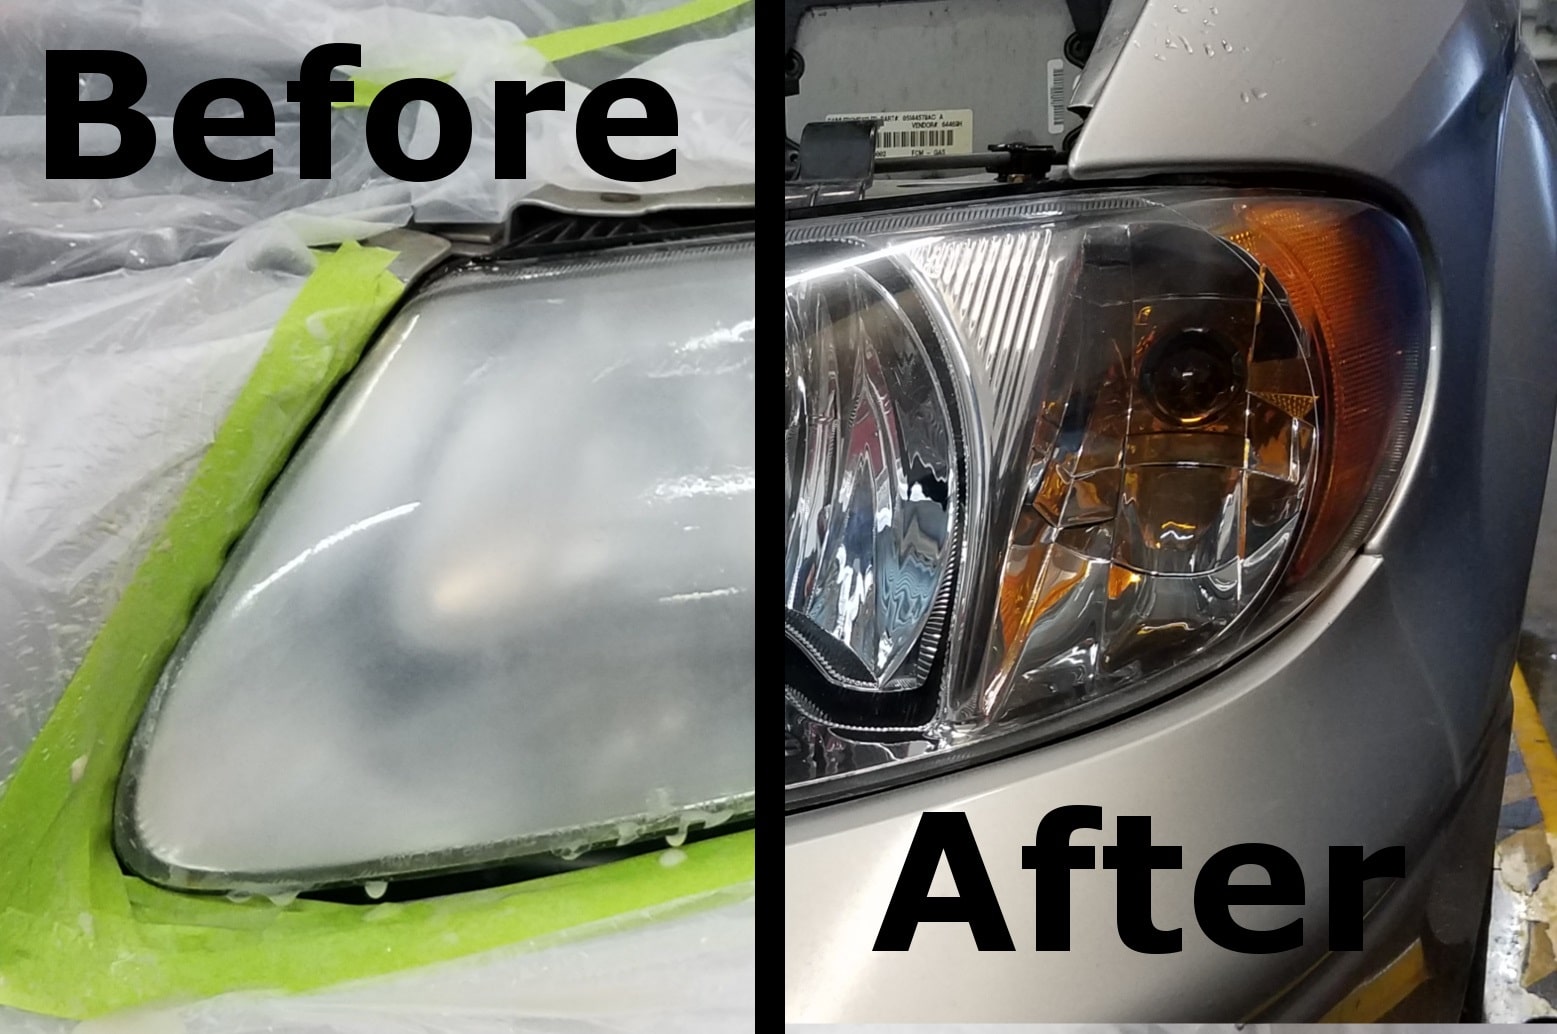
This is where they really come to life and even with these headlights not being that bad
you can still see there’s a huge difference.
Superior Headlight Restoration Method
This headlight restoration method is far superior to any other headlight restoration method out there. I’ve tried all of them, toothpaste and all that stuff is just a bunch of gimmicks. In order to get these headlights back to the original, you’re gonna have to sand off all that oxidation, and as you can see we ended up with some pretty amazing result for results here.
Something you’re definitely not gonna do is use toothpaste or some of the other so-called headlight restoration methods out there.
This is a pretty permanent fix if you keep a headlight UV protector on them. Opposed to putting a clear coat on your headlight something you definitely don’t want to do that to clear coat is gonna impede the actual functionality of the headlights
I’ve seen other YouTube videos where they sand them down and I’m spraying with a clear coat highly not recommended
The right way to fix oxidized Plastic headlights
This is the right way to fix oxidized Plastic headlights. This is the ultimate
headlight restoration method and anybody can do it with a three-step process of sandpaper and polish, and that’s it and this is the results you get.
More Headlight Restoration tips from a different perspective
There are valid arguments against clear coat, but the arguments presented here don’t stack up. At the end of this comment, I’ll suggest what appears to be the best solution I’ve seen.
Firstly, if your headlights are good, never use a solvent or abrasive on them or you’ll remove the protective factory coating and find yourself looking at these kinds of videos. This includes bug spray, other oils, toothpaste, cutting/buffing polish, etc.
The headlights are coated in a UV protective layer in the factory. This is a specialized solution that absorbs into the polycarbonate surface in combination with heat treatment. It is not a clear coat. Using a solvent or abrasive on your headlights will compromise this protective coating.
If your lights have gone murky or yellow then the factory protection is already compromised and thus you need to take action. You could buy new lights or try something else. Once at this point, there is a valid argument of “what have I got to lose?” to try something else. But, there is a lot of very bad advice out there which I’d like to address here.
Like most DIY solutions proposed on this topic, this video is only half the job. Once you have prepared the headlight as shown in this video, you must protect the headlight from UV with a permanent barrier, not just a temporary one using a polish like that shown here. The problem with relying on polish UV protection is that you need to maintain it continually. Where I live that means polishing my lights every two months because our sun is exceedingly harsh. This simply isn’t realistic and I have better things to do. My car lives outside which doesn’t help matters either. (One day I’ll have space for a car in my garage… but not today.)
A good UV-protected clear coat specifically designed for a polycarbonate surface could be a reasonably good solution after sanding and then buffing the headlight as demonstrated in this video. The massive mistake I consistently see is the failure to remove any protector or wax contained in the buffing compound before the clear coat application. This is painting 101 and yet consistently absent from most instructional videos. However, does such a clear coat exist? The chemical formula of a clear coat could dissolve or weaken the headlight. It also expands and contracts at a different rate than the headlight which can lead to long-term damage. But, if a clear coat exists specifically designed for this purpose then it’s presumably a valid option.
The common arguments against clear coats are generally two-fold: It interferes with the light refraction and can be more difficult to deal with in the future.
The light refraction argument seems completely absurd. Headlights are not precisely focused beam. They’re not a laser. Their purpose is to spread light around so you can see around you. Although a clear coat will marginally alter (refract) the output on a different angle, this will be pragmatically immeasurable, but assuming it does affect the angle, just compensate by adjusting your headlight tilt. But, is the refraction alteration from clear coat worse than a murky headlight? What about water? Water will refract the light considerably. Should we avoid using headlights in the rain? BTW, the polish/wax, etc contained in your car wash will also influence the light refraction. This argument, which I’ve heard before, isn’t valid.
Another argument is “Clearcoat will peel and can be hard to deal with in the future”. Well, perhaps. If done right, I don’t see why it wouldn’t last 5+ years. Peeling is probably common with poor quality clear coats that are not UV protected (‘indoor-only’) but the big reason is a poorly prepared surface (wax and grease not removed). I’d rather sand off the clear coat that ‘might’ require attention every 5+ years than polish my headlights every few months.
There seems to be an orange peel argument floating around. I don’t consider this a particularly good argument because I doubt it will have much bearing on the operation of the lights. I accept that it might look a bit crap but it still looks better than a murky UV damaged the light. However, orange peel means you haven’t finished the paint job. If you do a job bad enough to get orange peel, then fix it i.e. finish the paint job. To say “don’t clear coat due to orange peel effect” is to say “don’t use this solution because you might only do half the job”.
Many people have suggested a UV stable 2K paint. I cannot attest to the suitability of this but 2K paints contain some nasty compounds necessitating the need for protective gear. If 2K contains isocyanates like I suspect it does, then the protective gear is essential. You’ll see a lot of youtube clips with people saying, ‘use a mask’. This unqualified and typically casual off-hand statement is irresponsible. You must use a ‘suitable’ mask that is rated for that type of contaminant, which means charcoal filtered mask ‘at a minimum’ but ensure even that is rated for the task. Additionally, use eye protection. Not just safety goggles, but ‘sealed’ eye protection as these nasty chemicals are absorbed through your eyes. A full-face mask is another option instead of a separate mask and goggles.
But, having said all of that, the heat stretchable UV protective film seems like the winner to me. This film is commonly used to ‘tint’ headlights and taillights but it does come in clear. Prepare the headlights as shown in this video, then apply the UV protective film that applies much like window tint film. This film should last many years without any maintenance and can be easily removed in the future. It appears to give you the advantage of a clear coat without the expertise necessary or disadvantages of a clear coat. Yes, the film will also have a refraction index to it… probably worse than clear coat.. but still much less than water, and of an amount that is still irrelevant.
Headlight Restoration DIY Preparation And Protection That Will Last “Up-Dated Method”
Headlight Restoration DIY Preparation And Protection That Will Last OK Like the title says be talking about Headlight Restoration DIY Preparation And Protection That Will Last
I’m going to bust all the headlight restoration myths in this video and explain what really works to keep your headlights looking like new for years to come if your headlights have become hazy oxidized and starting to yellow this is the video for you.
Due to all the misinformation out there plus all the feedback I have gotten on the headlight restoration video I did over a year ago. I have come to a method everyone can agree with and if you know of better headlight restoration and protection practices be sure to comment below with what works for you.
Products in this video:
**Nano-glass-ceramic coating designed specifically for polycarbonate headlight https://amzn.to/2O3qCR5
Mother’s aluminum polishes https://amzn.to/330ZBSo
Wipe on Headlight protectant https://amzn.to/2s1M3JJ
Headlight polish/ 3m hard plastic cleaner https://amzn.to/32XNPYV
Spray Clear Coat https://amzn.to/2px70v1
Headlight restoration sandpaper kit https://amzn.to/2Kz2wv5
**3m Headlight restoration kit https://amzn.to/2O1iD6N
Clear vinyl protectant https://amzn.to/340ouiA
**Meguiars headlight restoration kit https://amzn.to/37ot107
WD-40 https://amzn.to/2r9UYbm
Toothpaste https://amzn.to/32VvM5O
I will also be referring to it a lot in this video because the preparation method will
be the same and definitely the best way hands down to fix your UV damaged headlights. Were a lot of the controversy comes in is when it comes to how you should protect your freshly restored
plastic headlight
And there are many different ways, all with there advantages and disadvantages as well as the price and time and skill it will take. I will be answering all
questions in this video.
Depending on the condition of your headlights, weather it just is some light fading
or some very bad oxidation and yellowing
Or maybe the factory clear code is starting to chip from the headlight lens.
This will determine how you should go about restoring your headlight.
If the factory protectant layer is still intact I would just recommend a light polish with a 3000 grit sandpaper and a light compound I like to use from 3m
Subscribe to my youtube channel here: https://goo.gl/j1pCfn
For the most common automotive fixes to the most common car and truck problems. DIY auto repair to help you save money.
i’ve heard of using toothpaste to do this but it seemed like a bad idea
Could road salt be a major cause of buildup on headlights? My wife’s headlights look perfectly new and she has had her car for 3 years now but the only difference I can think is that she doesn’t drive her car in the winter. She used my spare truck since it handles better with the snow and ice around here. I am going to try what you mentioned in the video and see if I can clean it up!
When do you use the 3M Lens and Hard Plastic Cleaner –
thanks ,much appreciate
Thanks for the professional way to clear head light plastic cover . I just bought a 2006 Colorado work truck and it looks like there are several round or odd shaped something inside the plastic cover. Have you ever seen any thing like that and looks like that cannot be fixed. Please reply back if you have the time and thanks again for a great presentation.
Gilbert Brown
Wasn’t able 2 mate link(s) w product: heat stretchable UV protective film. Issue could just b that I’m old. If u would clarify this step in the process so my business can, also, benefit from your expertise.
I will b modifying my process; yours produces a far superior end product
Thank u once again,
Sam Letaw 27592
Great debunking of all the gimmicks .
Nice tips. They help me a lot. Driving will be effected if headlights aren’t cleaned. And I tried simple car maintenance, it doesn’t effect.