
Alright guys, so today I’ve got something that’s gonna blow your mind. I’m talking about the worst grinding brake situation I think I’ve ever seen on a truck. And I’m not exaggerating here – there’s literally almost no brake rotor left on this thing. I can’t believe this guy was actually driving around with his brakes in this condition. It’s not just unsafe, it’s downright dangerous. We’re gonna take a look at what happens when you ignore those grinding noises for way too long, and what you need to know to avoid ending up in this same situation.
What Happens When Brakes Grind Down to Nothing
So the thing is, when you first hear that grinding noise from your brakes, that’s not just an annoying sound – that’s metal-on-metal contact. What we’re gonna do here is break down exactly what’s happening inside your brake system when things get this bad.
Basically, your brake pads have a friction material that does the actual stopping. When that material wears down completely, you’re left with the metal backing plate grinding directly against your brake rotor. And once that starts happening, you’re eating through the rotor itself at an alarming rate.
⚠️ Warning
Never drive with grinding brakes or ignore metal-on-metal contact noises. This isn’t just about replacing parts – you’re risking complete brake failure, loss of vehicle control, and serious injury. If you hear grinding, get the truck off the road and fix it immediately.
In this particular case, the rotor was worn so far down that it was way below the minimum thickness specification. Each brake rotor has a stamped minimum thickness – usually somewhere around 22mm for most trucks – and going below that means you’re asking for catastrophic failure. The rotor can crack, warp, or even break apart while you’re driving.
When you ignore grinding brakes, you’re not just damaging parts – you’re turning your truck into a safety hazard on wheels.
Real quick, let me explain what happens to the other components too. When your rotor gets this bad, your caliper pistons are getting pushed way further out than they should. Your brake fluid level drops because more fluid is being held in the calipers. And the heat from all that metal-on-metal grinding? That can damage your calipers, brake lines, and even your wheel bearings.
Measuring Rotor Thickness – How to Know It’s Too Late
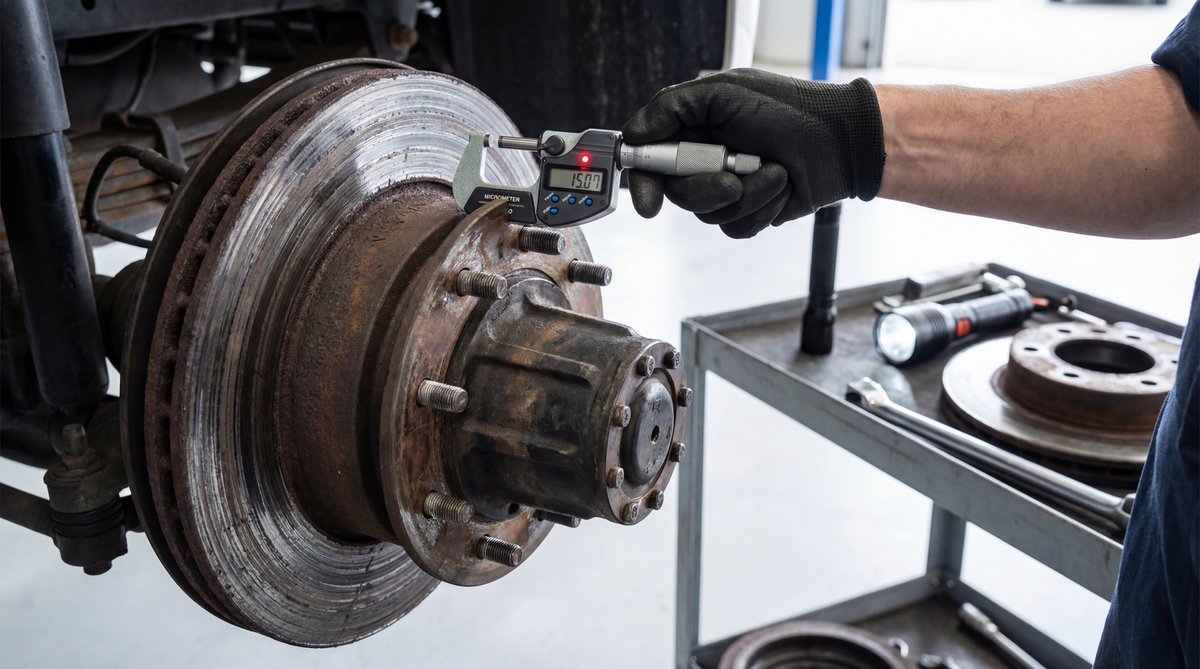
Alright, so here’s how you actually measure a brake rotor to see if it’s still good or if it needs to be replaced. You’re gonna need a micrometer – specifically one that can measure in the 0 to 2.25 inch range for most truck rotors. You can grab a brake rotor micrometer from pretty much any tool supplier.
🔧 Pro Tip
Don’t just measure in one spot. You need to measure the rotor thickness at 8 to 12 different points around the rotor. Rotors can wear unevenly, and you might find it’s within spec in one area but dangerously thin in another spot.
The thing is, every rotor has its minimum thickness stamped right on it – usually on the outer edge or the hat section. You’ll see something like “MIN TH 22MM” or similar. That’s your cutoff point. If your measurements come in below that number anywhere on the rotor, it’s done. No ifs, ands, or buts about it.
When you’re measuring, you also want to check for runout. That’s basically how much the rotor wobbles when it spins. According to brake system specifications, your rotor runout should be less than 0.002 inches. Any more than that and you’re gonna get vibration and uneven wear on your new brake pads.
❌ Common Mistake
A lot of guys will try to resurface or “turn” a rotor that’s already close to minimum thickness. Don’t do it. Resurfacing takes off material, and you might end up with a rotor that’s below spec after machining. When in doubt, just replace it – rotors aren’t that expensive compared to the risk.
Tools and Parts You’ll Need for a Full Brake Job
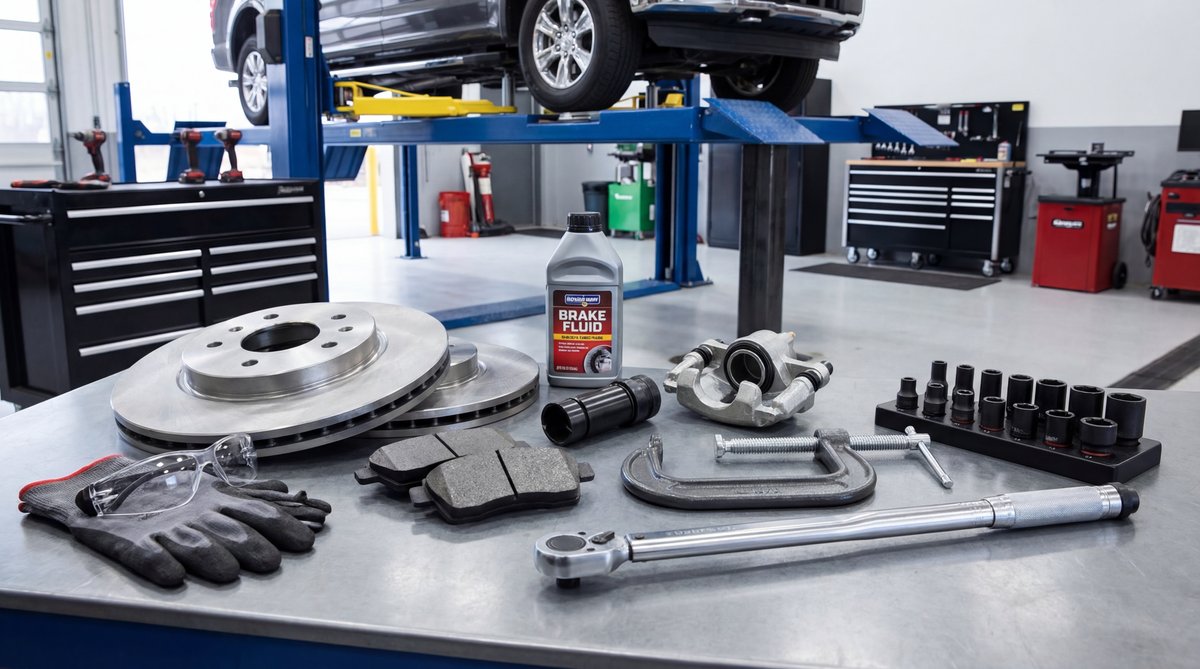
Alright guys, let’s talk about what you’re actually gonna need to fix a brake situation like this. Because once you’ve let your brakes get this bad, you can’t just slap new pads on and call it a day – you’re replacing everything.
🔧 Tools Needed
- Floor jack and jack stands (never trust just a jack)
- Lug wrench or impact wrench
- Torque wrench capable of at least 140 ft-lbs
- Brake caliper piston tool
- Micrometer or brake rotor gauge
- Wire brush for cleaning
- Brake cleaner spray
- High-temp brake grease
- Brake bleeding kit
Now for the parts. When you’re doing a full brake job on a truck, here’s what we’re gonna need:
Brake Rotors: You’ll need two for the front axle (or four if you’re doing all four corners). I usually go with quality aftermarket rotors like Bosch or Brembo – you’re looking at anywhere from $30 to $100 each depending on your truck. Don’t cheap out on rotors from some no-name brand. Your brakes are literally what keeps you from crashing.
Brake Pads: Get a good set of ceramic or semi-metallic pads. Budget around $25 to $70 for a complete axle set. The thing is, ceramic pads create less dust and are quieter, but semi-metallic pads handle heat better for heavy-duty truck use.
Caliper Hardware Kit: This includes new pins, clips, and all the little hardware pieces. These run about $10 to $25, and trust me, you want fresh hardware. Those pins and clips wear out, and proper brake hardware is critical for even pad wear and quiet operation.
Brake Fluid: You’ll need DOT 3 or DOT 4 brake fluid – check your owner’s manual to see which one your truck uses. A bottle runs about $10 to $20 and you’ll probably use most of it if you’re doing a complete brake bleed.
💰 Money Saver
You can find all these parts at NAPA Auto Parts, AutoZone, or O’Reilly. Real quick tip though – call around and check prices. I’ve seen the same rotor vary by $30 or more between different stores on the same day.
What This Repair Actually Costs
So let’s break down what you’re actually looking at money-wise. The thing is, fixing brakes that have gotten this bad isn’t cheap – whether you do it yourself or take it to a shop.
| DIY Cost | Shop Cost | You Save |
|---|---|---|
| $125-$335 | $275-$635 | $150-$300+ |
Here’s the detailed breakdown for doing it yourself:
- Brake rotors for front axle: $60-$200
- Front brake pads: $25-$70
- Caliper hardware kit: $10-$25
- Brake fluid: $10-$20
- Brake cleaner and supplies: $10-$20
Now if you take it to a shop, you’re looking at all those parts plus labor. Most shops are gonna charge you anywhere from $150 to $300 in labor for a front brake job. And that’s at an independent shop – take it to a dealership and you can easily add another $100 or more to that.
Basically, if you’ve got the tools and the know-how, you can save yourself a couple hundred bucks easy. But here’s what I always tell people – if you’re not comfortable working on brakes, this isn’t the place to learn. Brakes are a critical safety system, and messing them up can get you or someone else killed.
Critical Safety Warnings You Can’t Ignore
Alright guys, we need to have a serious talk about safety here. Working on brakes isn’t like changing your oil – one mistake and you could end up with no brakes at all when you need them most.
⚠️ Warning
Always use jack stands on a flat, level surface before getting under your truck. I don’t care how quick the job is supposed to be – a floor jack can fail, and you don’t want to be under a truck when it does. Safety glasses and gloves are non-negotiable too.
When you’re working on brakes, there’s a few things that can really mess you up if you’re not careful:
Never reuse rotors that are below minimum thickness. I’ve seen guys try to “just make it work” with thin rotors, and it never ends well. The rotor can crack or warp from the heat of braking, and then you’ve got no stopping power at all.
Don’t skip the torque wrench when you’re putting the wheels back on. According to proper brake installation procedures, lug nuts need to be torqued to 120-140 ft-lbs in a star pattern. Over-tightening or tightening in a circle can warp your brand new rotors, and under-tightening means your wheel could come off.
🔧 Pro Tip
After you get the truck back on the ground, pump the brake pedal several times before you try to drive. When you compressed the caliper pistons to install the new pads, you pushed all the brake fluid back. You need to pump the pedal to get the pistons positioned correctly against the new pads, or you’ll have no brakes on your first stop.
Real quick, let me tell you when you should NOT try to do this yourself. If the brake pedal feels spongy after your repair, if you see any brake fluid leaking, or if you hear any weird noises that weren’t there before – stop and get it to a professional. Same thing if your calipers are seized or your brake lines are damaged. Some repairs are beyond DIY, and there’s no shame in admitting that.
❌ Common Mistake
A lot of people forget to bleed the brakes properly after doing caliper work. If you opened any brake lines or pushed the pistons back really far, you’ve probably introduced air into the system. Air in your brake lines means a spongy pedal and reduced stopping power. Take the time to bleed the brakes correctly – your life depends on it.
The bottom line here is that the grinding brakes in this video represent a massive safety failure. The owner of this truck was literally gambling with his life every time he got behind the wheel. Don’t be that guy. If you hear grinding, squealing, or any unusual noises from your brakes, get them checked out immediately. It’s way cheaper to replace pads than to replace pads, rotors, calipers, and possibly fix damage to your wheel bearings and suspension from a brake failure.
Frequently Asked Questions
What are the most common mistakes when doing truck brake repairs?
Alright, so the biggest mistakes I see are: not measuring rotor thickness before deciding to reuse them, over-tightening lug nuts in a circle instead of a star pattern which warps the rotor, contaminating new pads or rotors with grease or brake fluid, and skipping the brake bleed when it’s needed. Another big one is not replacing the caliper hardware – those clips and pins wear out and need to be fresh for proper pad movement.
How can I prevent brake rotor warping?
The thing is, rotor warping usually comes from two main causes. First, improper lug nut torquing – you need to use a torque wrench and tighten in a star pattern to 120-140 ft-lbs depending on your truck. Second, excessive heat from riding the brakes or having seized caliper slide pins. Make sure you’re lubricating those caliper pins with high-temp brake grease, and replace the hardware kit so everything moves smoothly. Also, don’t spray cold water on hot rotors – that thermal shock will warp them for sure.
How do I measure brake rotor thickness accurately?
You’re gonna need a micrometer – specifically a brake rotor micrometer that can measure from 0 to 2.25 inches. What we’re gonna do is measure at 8 to 12 different spots around the rotor, because rotors don’t always wear evenly. Compare your measurements to the minimum thickness that’s stamped on the rotor itself – usually around 22mm for trucks. If any of your measurements come in below that minimum spec, the rotor is done and needs to be replaced, no exceptions.
What are the signs that a brake rotor needs to be replaced?
Real quick, here’s what to look for: grinding noises mean you’re already metal-on-metal and the rotor is getting destroyed, vibration or pulsing in the brake pedal usually means the rotor is warped, visible scoring or grooves in the rotor surface, any cracks at all (rotors with cracks need immediate replacement), and measurements below minimum thickness. Also, if the rotor has a blue tint to it, that means it’s been overheated and the metal structure is compromised – replace it.
What safety equipment do I absolutely need for grinding truck brake repairs?
Alright guys, here’s the non-negotiable safety stuff: jack stands rated for your truck’s weight (never work under a vehicle supported only by a jack), safety glasses to protect your eyes from brake dust and debris, gloves to protect your hands from sharp edges and brake cleaner, and a torque wrench for proper wheel installation. Work on a flat, level surface, and make sure the parking brake is set if you’re working on the front brakes. Basically, don’t cut corners on safety equipment – it’s way cheaper than a hospital visit.
