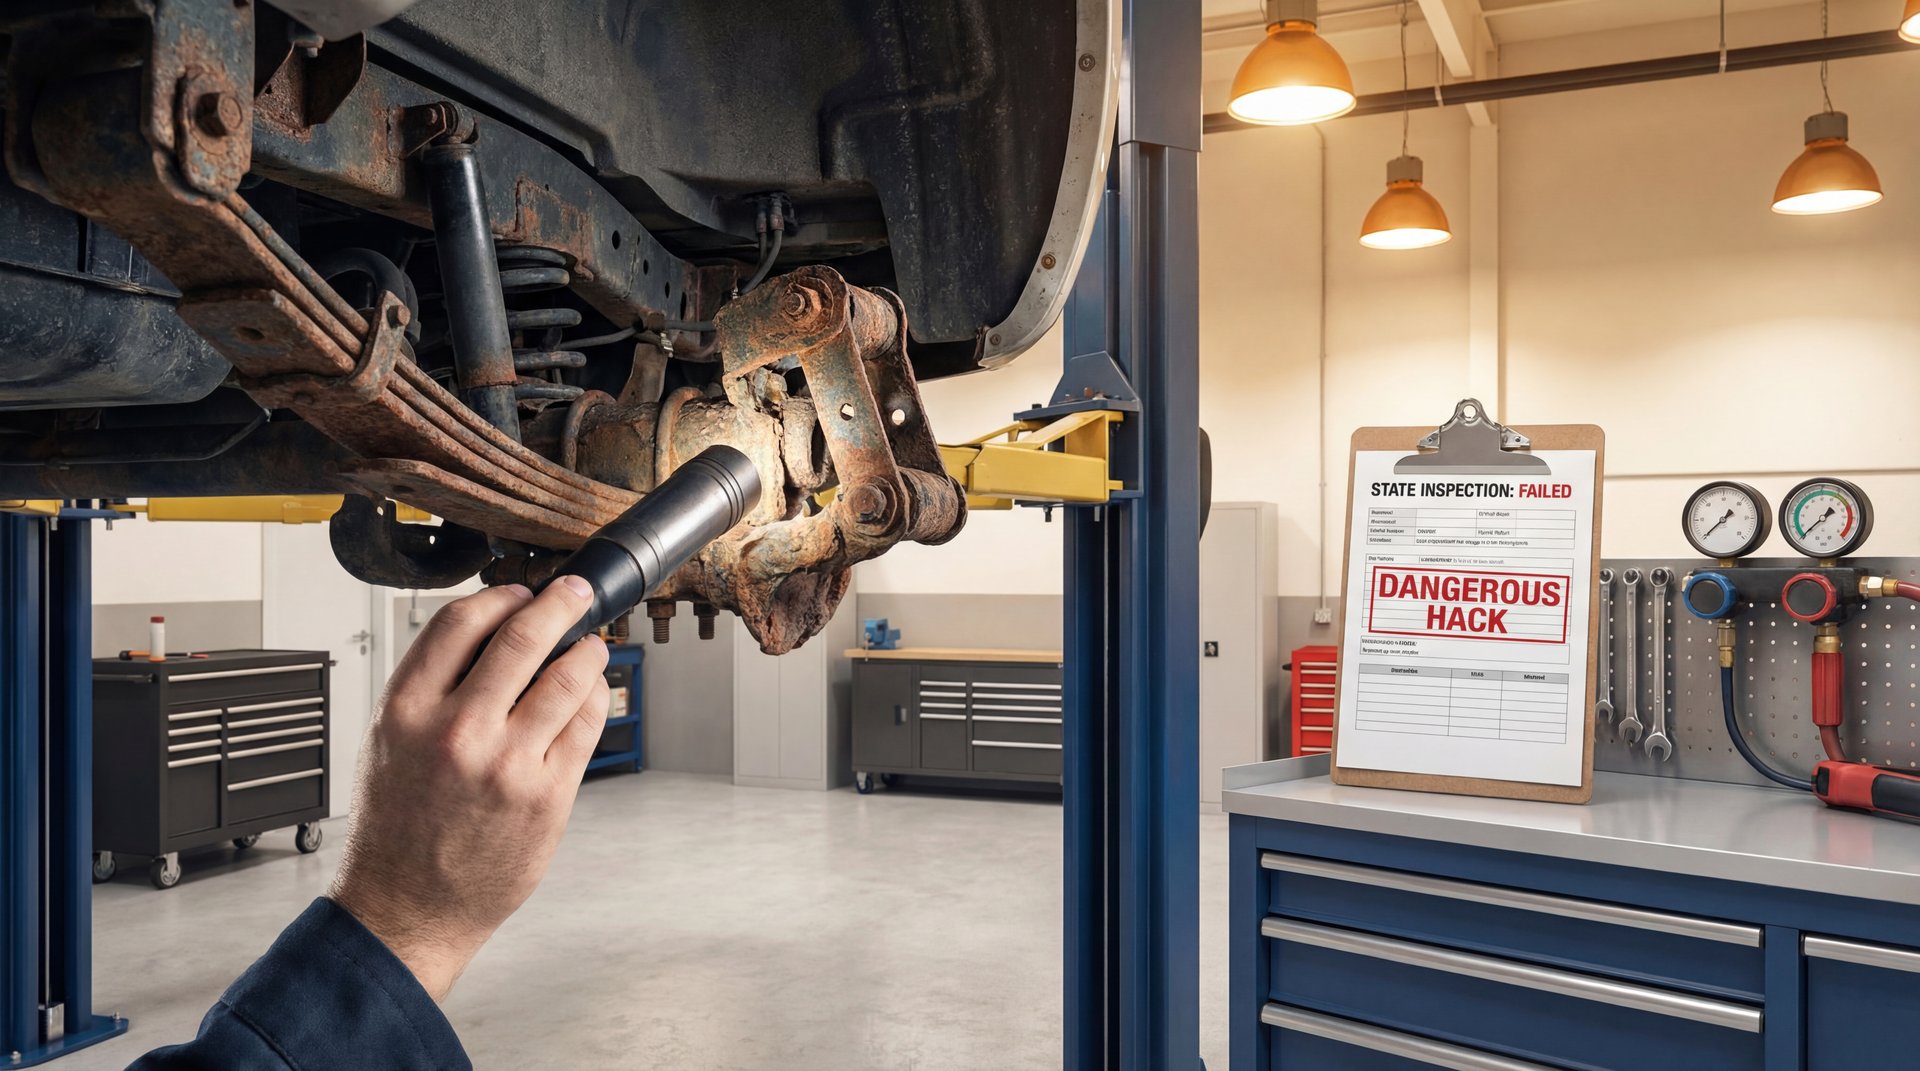
Alright guys, I want to show you something that absolutely blew my mind when this truck rolled in for a state inspection. This guy genuinely thought he was going to pass inspection with this setup, and honestly, I don’t know whether to be impressed by the creativity or horrified by the danger. What we’re dealing with here is a rear leaf spring shackle – you know, that critical suspension component that literally holds your rear axle in place – and this guy took a piece of tin and just slapped it over the rust to hide it. Yeah, you heard that right. He tried to cover up structural rust with sheet metal like he was patching a barn roof. This is exactly the kind of hack job that makes me want to pull my hair out, because not only is it dangerous, but it shows a fundamental misunderstanding of how vehicle safety works. Let me walk you through why this is such a bad idea and what you actually need to know about leaf spring shackles.
The Tin Cover-Up: Why This “Fix” Is Dangerous
So basically, what we’re looking at here is someone who knew they had a problem – they could see the rust eating through their shackle – and instead of fixing it properly, they decided to hide it. The thing is, a piece of tin doesn’t add any structural strength whatsoever. In fact, it makes things worse because now you’re trapping moisture between the tin and the rusted metal underneath, which accelerates corrosion even faster.
⚠️ Warning
Covering up rust with sheet metal, license plates, or any kind of patch material for the purpose of passing inspection is considered fraud in most states. More importantly, when that shackle fails – and it will fail – you’re looking at catastrophic suspension collapse that can cause you to lose control of the vehicle.
Real quick, let me explain what happens when a rear shackle fails completely. The rear of your leaf spring can either climb up into the bed floor or drop the axle backward. Either scenario means you’ve instantly lost rear suspension control on that side. If you’re on the highway when this happens, you’re probably not walking away from that accident. This isn’t like a squeaky belt or a burnt-out taillight – this is genuinely life-threatening stuff.
A piece of tin over rust doesn’t fix anything – it just hides the problem until catastrophic failure occurs.
I’ve seen people use all sorts of creative materials for these cover-ups: roofing tin, aluminum flashing, old license plates, even duct tape and spray paint. None of it works. Inspectors worth their salt know exactly what to look for, and most of them will peel back suspicious-looking patches or give the shackle a good whack with a hammer to see if it’s structurally sound.
What Leaf Spring Shackles Actually Do
Before we get into how to fix this properly, you need to understand what that shackle is actually doing back there. Basically, your rear leaf springs are long, curved pieces of spring steel that support the weight of your truck and absorb bumps. The front of the spring is bolted directly to a fixed hanger on the frame, but the rear end needs to move as the spring flexes and changes length when you drive over bumps or load the bed.
That’s where the shackle comes in. It’s a simple swing-arm setup – usually two stamped steel plates connected by bolts with rubber or polyurethane bushings. When the spring compresses or extends, the shackle pivots to allow that movement. Without it, the spring would bind up and either break or rip the mounting points right off your frame.
🔧 Pro Tip
Most light-duty pickups like F-150s, Silverados, and Rams use shackles with 5-8mm thick stamped steel plates. If you can see rust flaking off in layers that are 1-2mm deep, you’ve already lost significant structural thickness and the shackle needs replacement now.
The thing is, shackles live in a really hostile environment. They’re underneath the truck, exposed to road salt, water, mud, and whatever chemicals you drive through. The bushings can dry out and crack, letting moisture into the bolt sleeves. Once rust starts, it spreads fast, especially if you’re in the rust belt where they salt roads in winter.
Common vehicles that still use this leaf spring and shackle setup include pretty much every full-frame pickup from 1988 to 2018 – your Silverados, Sierras, F-Series, Rams, Tundras, and Titans. A lot of older SUVs like Tahoes, Yukons, Explorers, and 4Runners also use rear leaf springs with shackles. Most modern unibody cars and crossovers don’t have this setup, so this whole discussion is really for truck and older SUV owners.
How to Properly Inspect for Rust Damage
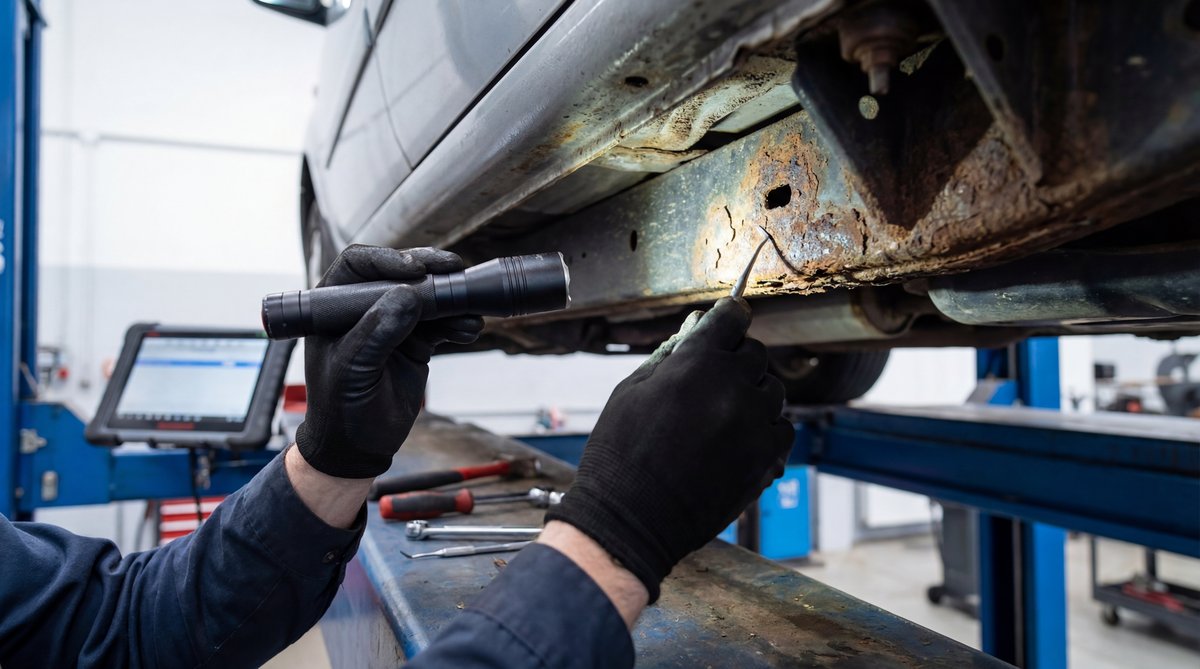
Alright, so let’s talk about how you should actually be checking your shackles for rust damage. What we’re gonna do is a visual and tactile inspection – you need to get under there with a good light and really look at every surface of the shackle plates, the bolts, and the frame hangers.
🔧 Tools for Inspection
- Flashlight or work light
- Wire brush
- Ball-peen hammer
- Screwdriver or pick tool
- Jack stands and wheel chocks
- Cut-resistant gloves and eye protection
Start by getting the truck safely supported on jack stands – never crawl under a vehicle that’s only on a floor jack. Use proper lifting procedures and set those stands under the frame, not under the rusty shackles themselves. Throw wheel chocks on the front tires and make sure the parking brake is set.
Now get under there with your light and really look at the shackle plates. Surface rust that just makes things look brown or orange isn’t the end of the world – that’s just the outer layer oxidizing. What you’re looking for is scale rust, which is when the metal starts flaking off in layers, or perforation rust, where you can actually see through holes in the metal.
❌ Common Mistake
A lot of people see surface rust and panic, or they see deep rust and figure a little more time won’t hurt. The thing is, once rust perforates through the plate thickness or necks down a bolt by more than 20-30%, that component has lost most of its strength. Don’t wait for complete failure.
Take your wire brush and scrub away the loose scale. If you’re brushing and big chunks are falling off, that’s a bad sign. Next, take your ball-peen hammer and give the shackle plate a solid tap – not hard enough to break anything, but firm. Listen for a solid “clang” versus a dull “thunk.” If it sounds dead or if the metal flexes more than it should, the rust has weakened the steel significantly.
Use your screwdriver or pick to probe any suspicious areas. If the pick sinks into the metal like it’s cheese, that section is completely compromised. Also check where the shackle bolts go through the frame hanger – if the frame itself is perforated or flaking around those holes, you’re now into frame repair territory, not just shackle replacement.
Here’s a quick list of the common signs of serious rust damage you need to watch for:
- Scale flaking – metal coming off in layers thicker than paint
- Perforation – visible holes through the shackle plate or bolt
- Necking – bolt shafts that look thinner in the middle than at the threads
- Soft spots – areas that flex or dent easily under probe pressure
- Frame damage – rust spreading to the shackle hanger or frame rail itself
- Sagging – one corner sitting visibly lower than the other side by more than an inch, which can indicate weak springs or failed shackles
Real quick, you should be doing this inspection at least once a year if you live in a high-rust area, or every two years if you’re in a dry climate. Any time you notice unusual handling, clunking noises from the rear, or visible sagging, get under there and check things out immediately.
The Right Way to Replace Rusted Shackles
Okay, so you’ve confirmed your shackles are rusted through and need replacement. What we’re gonna do now is walk through the actual repair process – the right way, not the tin-over-rust way. This is a job most DIYers can handle if you’ve got basic hand tools and a weekend afternoon, but if the frame is compromised or you’re not comfortable working under a truck, take it to a pro.
First, you need to get the right parts. Most aftermarket shackle kits from brands like Dorman, Moog, or Rough Country include two shackles (left and right), four bolts, four nuts, and new rubber or polyurethane bushings. Make sure you’re ordering for your specific year and model – a 2006 Silverado shackle won’t necessarily fit a 2010, even though they look similar.
| DIY Cost | Shop Cost | You Save |
|---|---|---|
| $80-$150 | $350-$600 | $200-$450 |
Typical rear shackle bolt torque specs fall in the 70-120 ft-lb range depending on your truck. For example, Ford F-150s from 2004-2008 usually call for about 111 ft-lb on both the shackle-to-frame and shackle-to-leaf bolts. Chevy Silverados from 1999-2006 are often around 74 ft-lb, and Dodge Rams from 2002-2008 are typically around 120 ft-lb. The thing is, you need to verify your exact spec in the factory service manual – don’t just guess based on what some forum post says.
Before you start wrenching, soak all the bolts and sleeves with penetrating oil. If those bolts have been in there for 10-15 years in a rust belt state, they’re probably seized solid. Give the penetrant at least an hour to work, or ideally spray them the night before you start the job.
🔧 Pro Tip
Support the rear axle with a jack stand before you start removing shackle bolts. The leaf spring is under tension, and if a rusted bolt suddenly lets go while you’re prying on it, that spring can move violently and cause injury. Keep your hands and face clear of the spring pack at all times.
Here’s the basic procedure: jack up the truck and support the frame on stands, then place another jack or stand under the rear axle to take the load off the springs. Remove the lower shackle bolt first – that’s the one connecting the shackle to the rear eye of the leaf spring. Then remove the upper bolt connecting the shackle to the frame hanger. If the bolts are seized, you may need heat or an impact wrench. Be really careful using a torch near the rear of the truck – fuel lines, brake lines, and wiring often run close to the shackles.
Once the old shackle is out, inspect the frame hanger closely. If it’s got rust perforation or deep pitting, you need to address that before installing new shackles. Light surface rust can be wire-brushed and treated with rust converter, but structural damage requires welding or hanger replacement by a qualified tech.
⚠️ Warning
Do not weld over rust scale without grinding back to clean, shiny metal on both the frame and the hanger. Welds over rust have zero strength and will fail almost immediately. If you’re not confident in your welding skills, this is when you take it to a professional.
Install the new shackle with the new bushings and hardware. Make sure the bushings are properly seated in the shackle eyes and spring eye – they should be snug but not pinched. Thread the bolts in by hand first to make sure everything lines up, then use your torque wrench to tighten to spec. Don’t just crank them down with an impact gun – over-torquing will crush the bushings and cause premature failure.
If you’re using greasable aftermarket shackles with zerk fittings, pump them full of NLGI #2 chassis grease until you see fresh grease appear at the bushing edges. This helps keep moisture out and extends the life of the bushings significantly. For more on proper lubrication techniques, proper bushing maintenance is critical for long-term durability.
💰 Money Saver
Polyurethane bushings cost about $10-20 more than rubber, but they last two to three times longer and don’t dry-rot like rubber does. If you’re already doing the job, spend the extra few bucks – you won’t have to do this again in five years.
What State Inspections Actually Check
Alright guys, let’s talk about what inspectors are actually looking for when they check your suspension during a state safety inspection. The thing is, every state has slightly different rules, but when it comes to suspension components like leaf spring shackles, they’re all looking for the same basic issues: structural integrity, excessive wear, and anything that could cause failure.
Most state inspection standards specify that suspension components cannot be cracked, broken, or missing, and they can’t have excessive corrosion that affects structural integrity. That last part is key – “affects structural integrity.” A little surface rust won’t fail you, but perforation or scale flaking absolutely will.
Inspectors will typically do a visual check first, looking for obvious damage, rust-through, or hackjob repairs like our tin-cover-up friend tried. They’ll also look for ride height issues – if one corner is sitting more than about an inch lower than the other side, that’s evidence of a suspension defect or weak springs, and many states will fail you for that.
Any attempt to hide structural damage with cosmetic covers or patches is grounds for immediate inspection failure – and in some states, it’s considered inspection fraud.
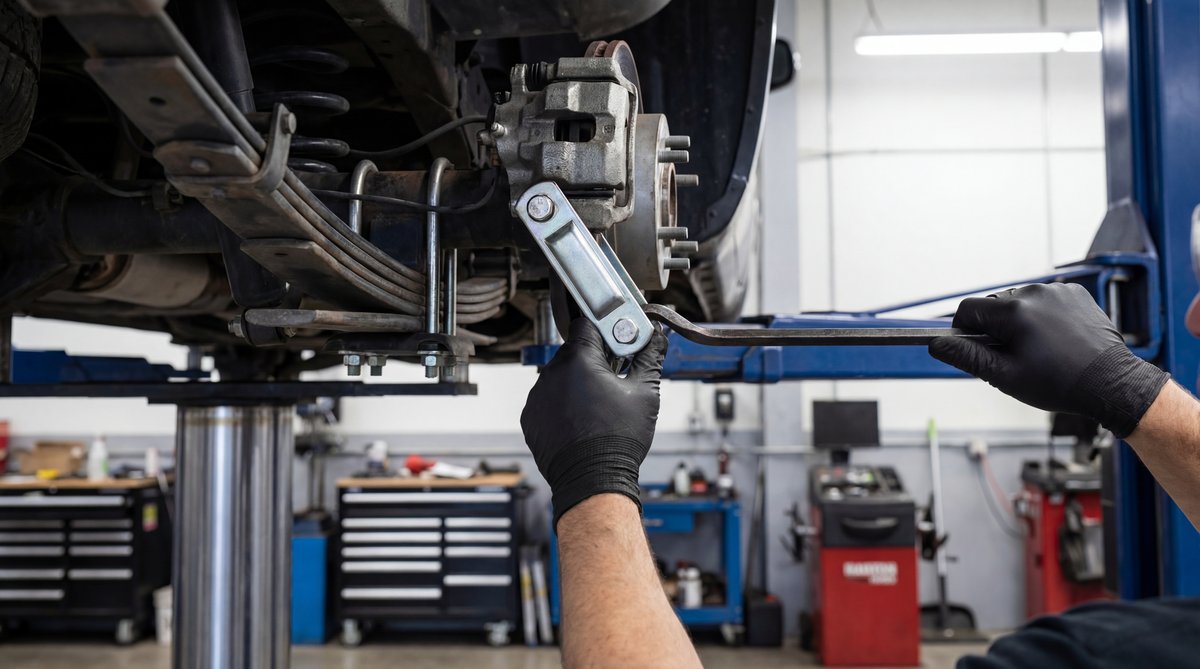
Next, they’ll get hands-on. A good inspector will grab the shackle and try to move it side-to-side and up-and-down. Excessive play indicates worn bushings or elongated bolt holes. They might also tap the metal with a hammer – basically the same test I described earlier – to check for structural weakness. If it sounds hollow or if chunks fall off when tapped, you’re not passing.
Some inspectors will use a pry bar to check for cracks in the leaf spring itself. If they find a cracked leaf, the whole spring pack typically needs replacement, not just the shackle. This is why it’s important to inspect the entire rear suspension, not just the shackles, when you’re under there doing maintenance.
Real quick, here’s what will definitely cause you to fail a state inspection related to rear shackles and leaf springs:
- Rust perforation through any suspension component
- Cracked or broken leaf springs
- Missing or obviously damaged shackles
- Excessive play or looseness in shackle pivots
- Visible patches or covers that appear to hide damage
- More than 1 inch side-to-side ride height difference
- Frame damage around mounting points
If you fail inspection for suspension issues and you live in a state that requires re-inspection documentation, you’ll need receipts showing proper repair with OEM or equivalent parts. Some states even require that frame welding be done by a certified welder and documented. This is another reason why trying to hide damage instead of fixing it properly is such a bad idea – you’re just delaying the inevitable and making it more expensive when you finally have to do it right.
Just like you’d want to properly diagnose other vehicle issues – for example, knowing where to look for AC leaks instead of just adding refrigerant – you need to address the root cause of suspension problems, not cover them up.
Frequently Asked Questions
What are the common signs of rust on leaf springs and shackles?
How can I properly lubricate the pivot points of the shackles?
What are the best practices for inspecting leaf springs?
How often should I inspect my leaf springs for cracks or movement?
What tools are essential for replacing a leaf spring shackle?
