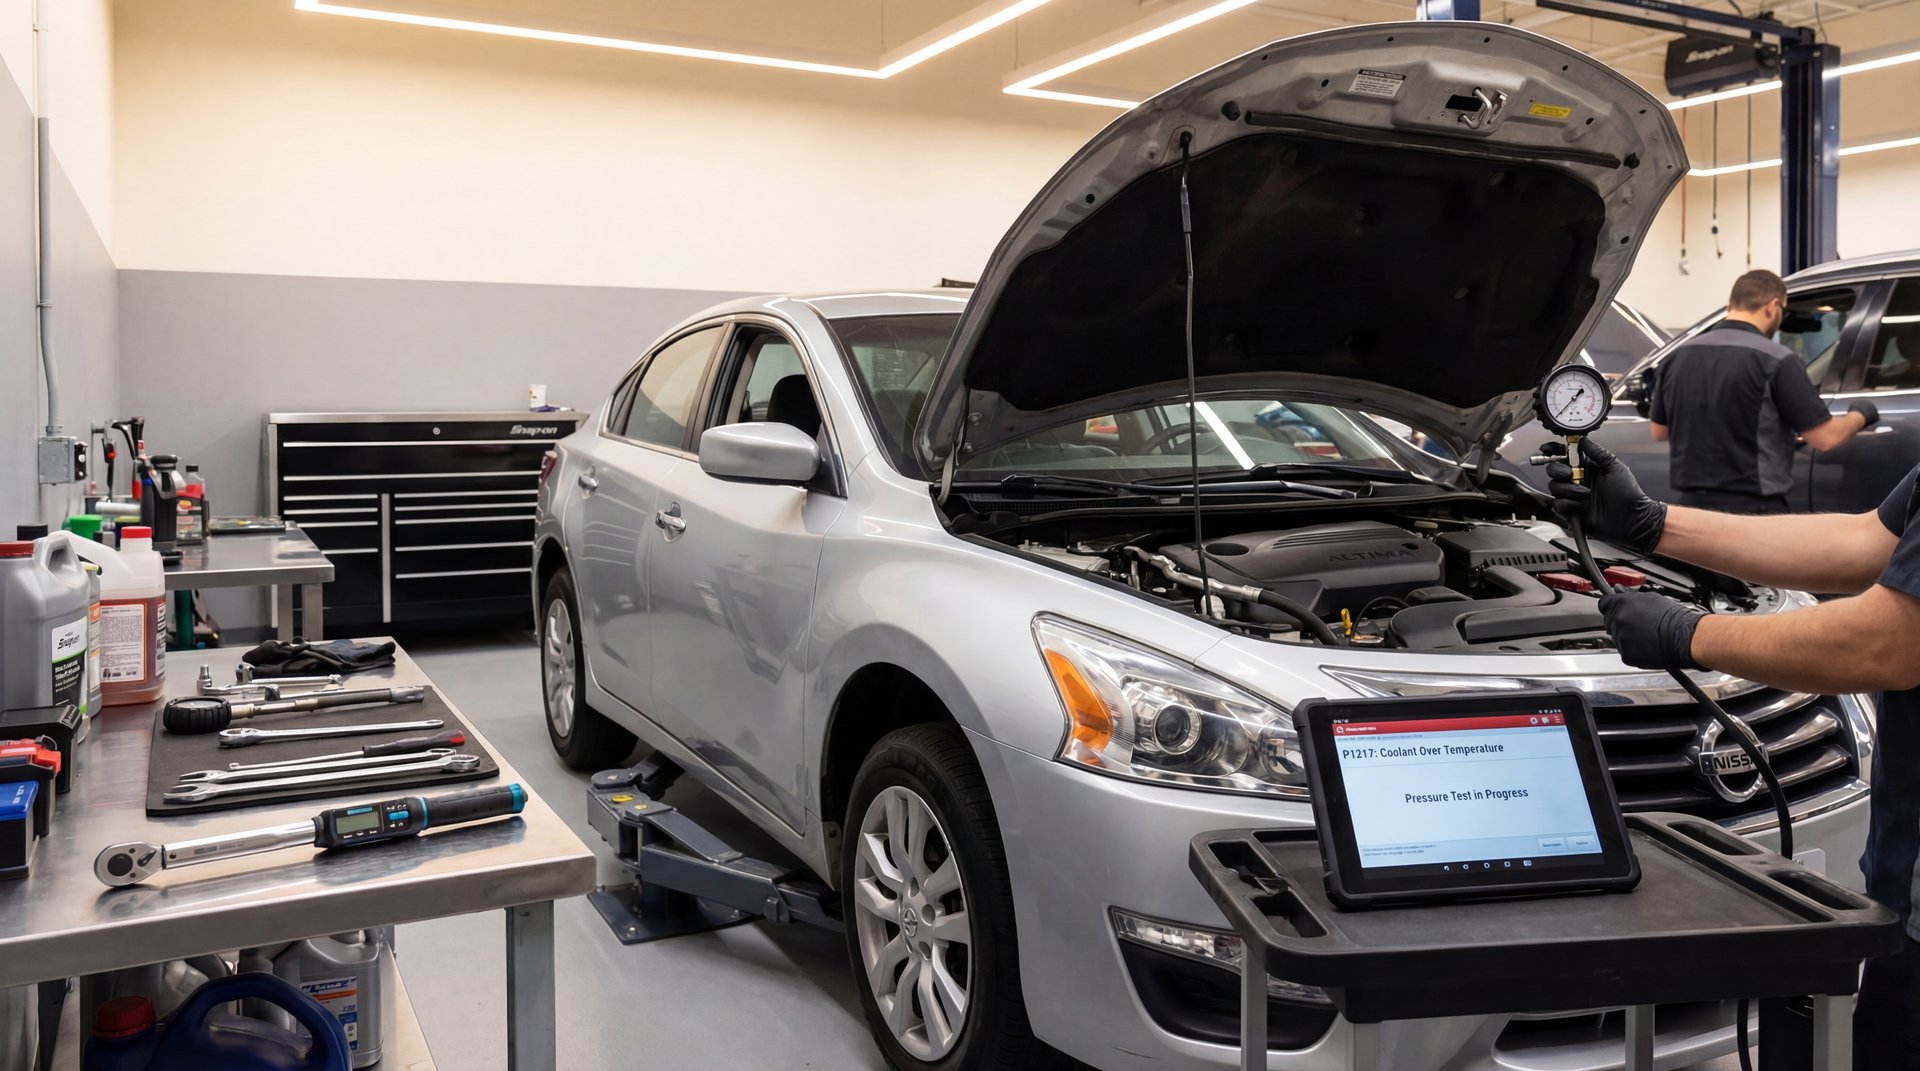
Alright guys, so today we’re working on a 2014 Nissan Altima that rolled in with a check engine light and a coolant leak. This is a super common problem I see all the time, and honestly, it’s one of those repairs that’s pretty straightforward once you know what you’re doing. I’m going to walk you through exactly how to properly pressure test your cooling system to find leaks, and we’re also dealing with a P1217 code on this one—which basically tells us the ECM is seeing some weird coolant temperature issues. If you’ve got a check engine light that won’t go away, there’s a good chance it’s related to your cooling system, so stick around because I’m going to show you the whole process from start to finish.
Verifying the Customer Concern
So first things first, we always want to verify what the customer is complaining about. This Altima has about 123,000 miles on it, and the customer mentioned they’ve got a check engine light and they think there’s a coolant leak. When I first looked at it, we also had a traction light and a brake light on, which is pretty typical when you’ve got multiple systems acting up.
The thing is, you can’t just assume what the problem is. You gotta actually confirm it. So we’re getting this thing in the shop and we’re going to start by scanning for codes, then move on to the pressure test. This is the proper way to diagnose cooling system issues—don’t just start throwing parts at it.
⚠️ Warning
Before you do anything with your cooling system, make absolutely sure the engine is cold. I’m talking under 100°F. Pressurized hot coolant can spray out and cause serious third-degree burns. Never remove a radiator cap on a hot engine—that pressurized system is holding around 15 PSI, which is serious force.
Scanning for Trouble Codes
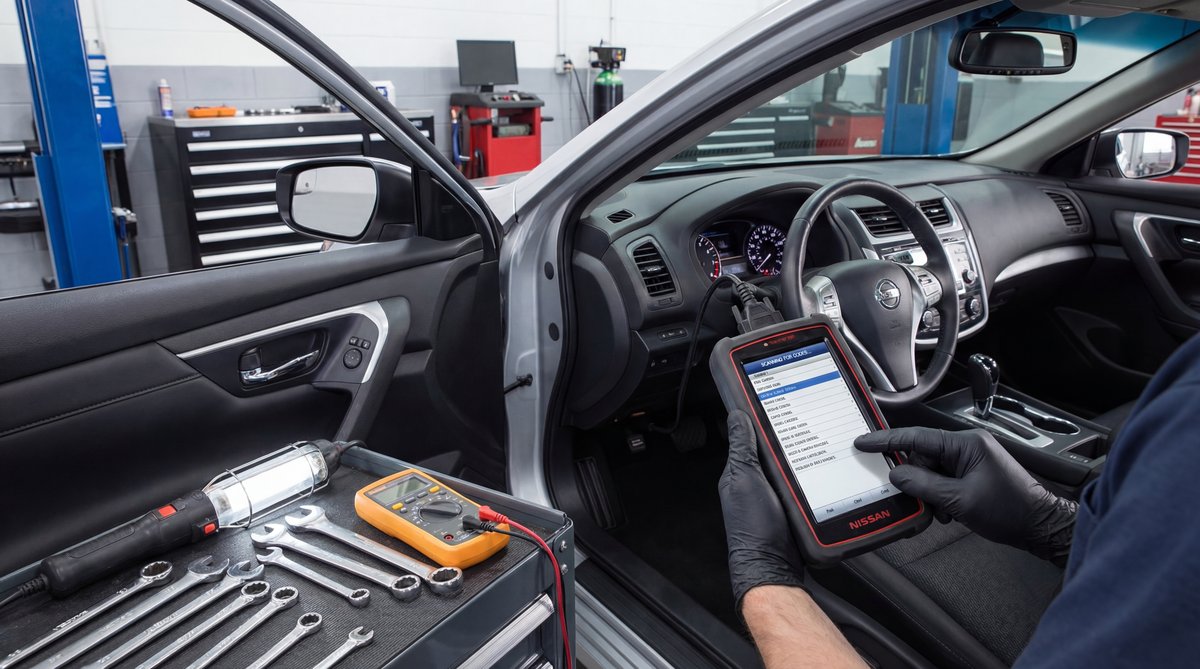
Alright, so I got my Autel scan tool hooked up here. Real quick, let me show you what we’re seeing. We’ve got 123,000 miles on this Nissan, and for the check engine light, we’re pulling a P1217 code. Now, P1217 is specifically for the engine control module detecting something off with the coolant temperature.
This code basically means the ECM is seeing a discrepancy between what the coolant temperature sensor is reading and what it expects to see. A lot of times, this correlates directly with a coolant leak because when you’re low on coolant, the temperature readings get all wonky. The sensor might be reading fine, but if there’s not enough coolant in the system, the ECM knows something’s wrong.
🔧 Pro Tip
The P1217 code doesn’t always mean you have a leak—about 40% of the time it can be a bad sensor or ECM issue. But when a customer mentions they’re losing coolant AND you see this code, you can be pretty confident there’s an actual leak somewhere. That’s why we’re doing the pressure test to confirm.
So this code definitely lines up with what the customer is saying about the coolant leak. Now we need to find out where it’s leaking from, and that’s where our pressure tester comes in.
Setting Up the Cooling System Pressure Test
Alright guys, let me show you the pressure tester I’m using here. This is honestly one of my favorite tools because it makes finding leaks super easy. One of the mechanics at our shop bought the exact same kit from the tool truck for like a thousand bucks. I found this thing on Amazon for not even a quarter of that price—we’re talking under $250. I’ll leave a link in the description, but basically, these universal pressure tester kits come with a bunch of different adapters so you can hook it up to pretty much any vehicle.
So what we’re gonna do is hook this directly to the radiator. First, I’m making sure the vehicle is completely cold—can’t stress that enough. Then I’m taking the radiator cap off. For this 2014 Altima, the cap is rated at 16 PSI, which is pretty standard. The OEM radiator cap part number is 21481-8990A if you need to replace yours, or you can grab an aftermarket Stant 10271 which works just fine.
Now we need to find the right adapter for the radiator neck. You’re looking at about a 1.65-inch diameter opening on these Altimas, so I’m sorting through the adapters that came with the kit until I find one that matches up with our coolant cap opening. Basically, you want something that’s going to seal up nice and tight. I’m using one of the spring-loaded gasket adapters because they give you a really good air-tight seal.
🔧 Tools Needed for This Job
- Cooling system pressure tester kit with adapters
- Autel or similar OBD2 scan tool
- Safety glasses
- Nitrile gloves
- Shop rags or towels
- Drain pan (if you need to top off coolant)
Once I’ve got the adapter that fits, I’m threading it onto the radiator neck and tightening it down. You want it snug, but don’t go crazy with it—just hand tight plus a little extra. Then I connect the pump to the adapter and we’re ready to start pressurizing the system.
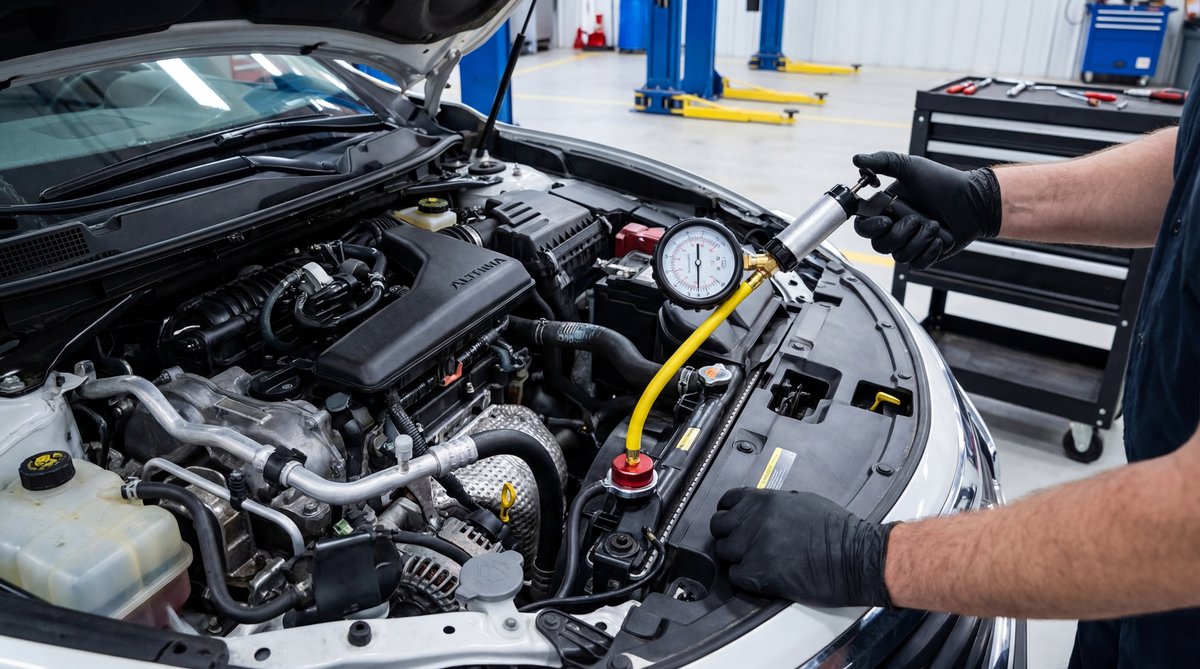
Pumping Up the System and Finding the Leak
Alright, so now I’m going to pump this thing up until we get to about 15 PSI. You’ll see there’s a little red line on the gauge—that’s your target. For Nissan Altimas, you want to test at 15 PSI to match the factory cap rating. Some people will tell you to go higher, but the thing is, you don’t want to exceed 18 PSI or you risk actually bursting a hose or popping something that wasn’t already leaking.
❌ Common Mistake
A lot of DIYers pump the system way too high thinking more pressure will help them find leaks faster. Wrong. Going over 18 PSI can actually damage weak spots in your radiator or hoses that were holding fine at normal pressure. Stick to 15-16 PSI and give it time—the leak will show itself.
So I’m pumping it up, and honestly, this one’s leaking so bad it won’t even hold pressure. That tells me right away we’ve got a pretty significant leak somewhere. Let me show you what we found.
We had to top off the coolant a little bit first because it was low—which makes sense if there’s a leak. Once we got some fluid in there and pumped it back up, you can see it dripping right here at the bottom of the radiator. Let me get a little closer so you can see exactly where it’s coming from.
Right there—see that? It’s dripping right where the plastic meets the aluminum at the bottom of the radiator. This is super common on Altimas once they hit around 100,000 miles. The plastic end tanks are crimped onto the aluminum core, and over time with heat cycles, that seal just starts to fail. You’ll see little drips forming right at that seam, and basically, once it starts leaking there, you need a new radiator. There’s no real fix for it.
When you see coolant dripping from where the plastic meets the aluminum on your radiator, that’s game over—you need a new radiator. No stop-leak product is going to fix that crimped seam.
So this one’s definitely going to need a radiator replacement. For a 2014 Altima, you’re looking at about $150-350 for an OEM radiator, or $80-150 if you go aftermarket. If you brought this to a shop, you’d probably be paying $800-1,500 total with labor, so doing it yourself can save you a good chunk of change.
| DIY Cost | Shop Cost | You Save |
|---|---|---|
| $200-400 | $800-1,500 | $600-1,100 |
Common Mistakes When Pressure Testing
Alright guys, let me tell you about some mistakes I see people make all the time with pressure testing. First one is testing on a hot engine. I already mentioned this, but it’s worth repeating—never, ever crack open your cooling system when the engine is hot. I’ve seen guys get seriously burned from pressurized coolant spray. Wait until everything is completely cold to the touch.
Second mistake is pumping the system too high. Like I said before, stick to 15-16 PSI. Some people think if they pump it to 20 or 25 PSI they’ll find leaks faster, but all you’re doing is potentially creating new leaks in components that were holding fine at normal pressure.
Third thing—and this is a big one—make sure your adapter is sealing properly. If you’ve got a loose adapter, the system will lose pressure and you’ll think you have a leak when really it’s just the tester leaking at the connection point. That’s why I like these spring-loaded adapters—they give you a really solid seal. If you’re not sure, you can put a little soapy water around the adapter connection and look for bubbles.
🔧 Pro Tip
If your pressure tester keeps leaking at the adapter, try applying a tiny bit of petroleum jelly or coolant around the gasket. This helps create a better seal without damaging anything. Just make sure you’re using an adapter that actually fits your radiator neck—forcing the wrong size is asking for problems.
Another mistake is not checking everywhere. When you pump up the system, don’t just look at the radiator. Check all your hoses, especially at the connection points. Look at the water pump—there’s a weep hole that will drip if the pump seal is bad. Check around the thermostat housing. On Altimas, the water pump actually fails pretty commonly around 120,000 miles, so if this car didn’t have an obvious radiator leak, that would’ve been my next suspect.
And here’s something a lot of people don’t think about—if the system won’t hold pressure but you can’t find any visible leaks, you might have an internal leak. That could be a head gasket letting coolant into the combustion chamber, or a bad heater core. If you’re losing coolant but not seeing any drips under the car or in the engine bay, that’s when you need to start looking at other tests like a compression test or a combustion gas test.
💰 Money Saver
Before you buy a pressure tester, check if your local auto parts store has a loaner program. A lot of AutoZones and O’Reillys will let you borrow one for free with a deposit. If you’re only doing this once, that’s way cheaper than buying the tool. But if you work on cars regularly like I do, having your own is definitely worth it.
Frequently Asked Questions
What PSI should I use to pressure test a Nissan Altima cooling system?
Does a P1217 code always mean I have a coolant leak?
Can I drive my car with a P1217 code?
What if my cooling system pressure tester leaks at the adapter?
Where do Nissan Altima radiators typically fail?
