# Honda Battery Light On? Here’s How to Test Your Charging System
Alright guys, so you’ve got your battery light on in your Honda and you’re wondering what’s going on with your charging system. Before you start throwing parts at it or paying a shop to diagnose it, I’m gonna show you exactly how to test your charging system yourself. The thing is, a lot of times it’s something really simple like corroded battery terminals, and you can save yourself a bunch of money by checking a few basics first.
Understanding the Battery Light Symptoms
So first thing, what we’re gonna do is talk about what you’re actually seeing. When that battery light comes on your dash, it’s telling you that your charging system isn’t working properly. Now, a lot of people automatically think “oh, my alternator’s bad,” but hang on a second – that’s not always the case.
Your Honda’s charging system is basically three main components: the battery, the alternator, and all the wiring and grounds that connect everything together. When that light comes on, it could be any one of these things causing the problem.
⚠️ Warning
If your battery light is on, you should avoid driving long distances. Your car is running off battery power only, and once that battery drains, you’re gonna be stuck on the side of the road. Get this diagnosed as soon as possible.
The most common symptoms you’ll see are the battery light on the dash, maybe your headlights are dimming, or your accessories aren’t working right. Some of you might notice the light comes on at idle but goes away when you rev the engine – that’s a classic sign of a failing alternator or a loose belt.
40-60%
OF CASES
are just corroded terminals or loose grounds, not a bad alternator
Checking Your Battery Terminals First
Real quick, before you do anything else, we’re gonna check those battery terminals. This is probably the most common mistake people make – they skip right past this and start testing the alternator. I can’t tell you how many times I’ve seen people replace a perfectly good alternator when all they needed to do was clean their battery terminals.
Pop your hood and take a look at your battery. What you’re looking for is any white, green, or blue crusty buildup on the terminals. That’s corrosion, and it acts like an insulator – it stops the electrical current from flowing properly. Even if it looks like just a little bit, it can cause your whole charging system to act up.
🔧 Tools Needed for Terminal Cleaning
Wire brush or battery terminal cleaner
10mm socket or wrench
Baking soda and water (optional, for heavy corrosion)
Dielectric grease
Safety glasses
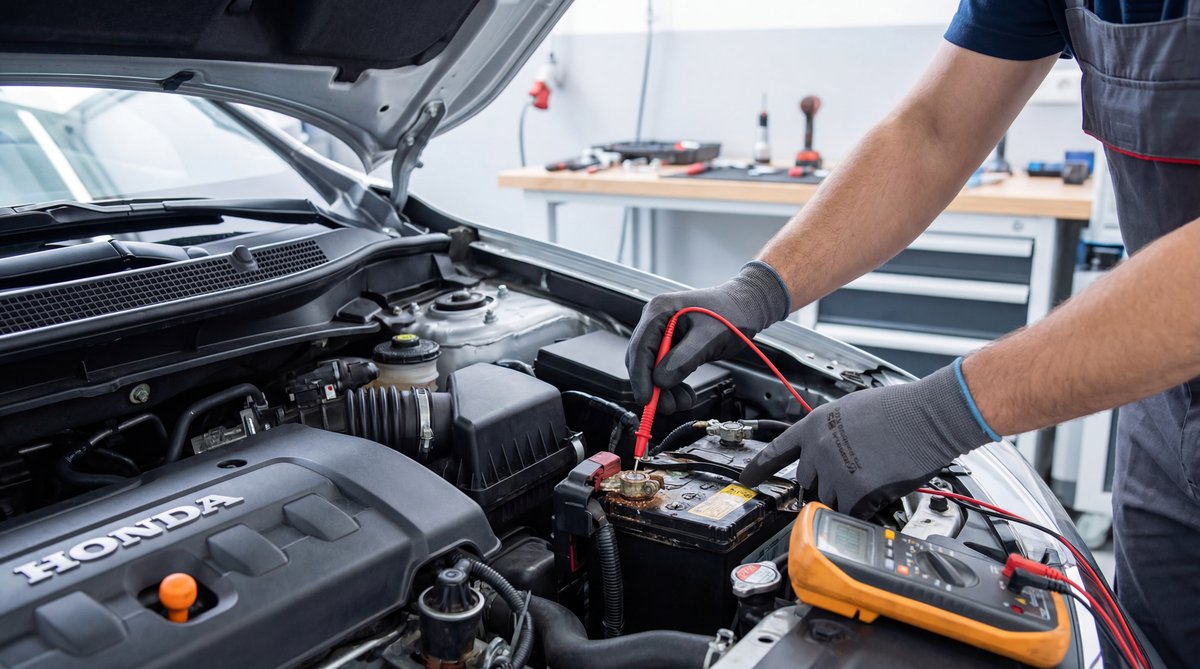
What we’re gonna do is disconnect the negative terminal first – that’s the black one. Loosen the nut, wiggle it off, and set it aside where it can’t touch the battery post. Then do the same with the positive terminal.
Now grab your wire brush and really scrub both the terminals and the battery posts until they’re shiny. I mean really get in there – you want bare, clean metal. If you’ve got heavy corrosion, you can use a little baking soda mixed with water to neutralize the acid, but make sure you dry everything thoroughly before you reconnect.
🔧 Pro Tip
When you reconnect the terminals, make them tight – really tight. A loose connection will cause the exact same symptoms as corrosion. After you tighten them down, put a little dielectric grease on top to prevent future corrosion.
Reconnect positive first, then negative, and tighten them down good. Start your car and see if that battery light is still on. You’d be surprised how many times this fixes the problem right here.
Testing Your Charging System Voltage
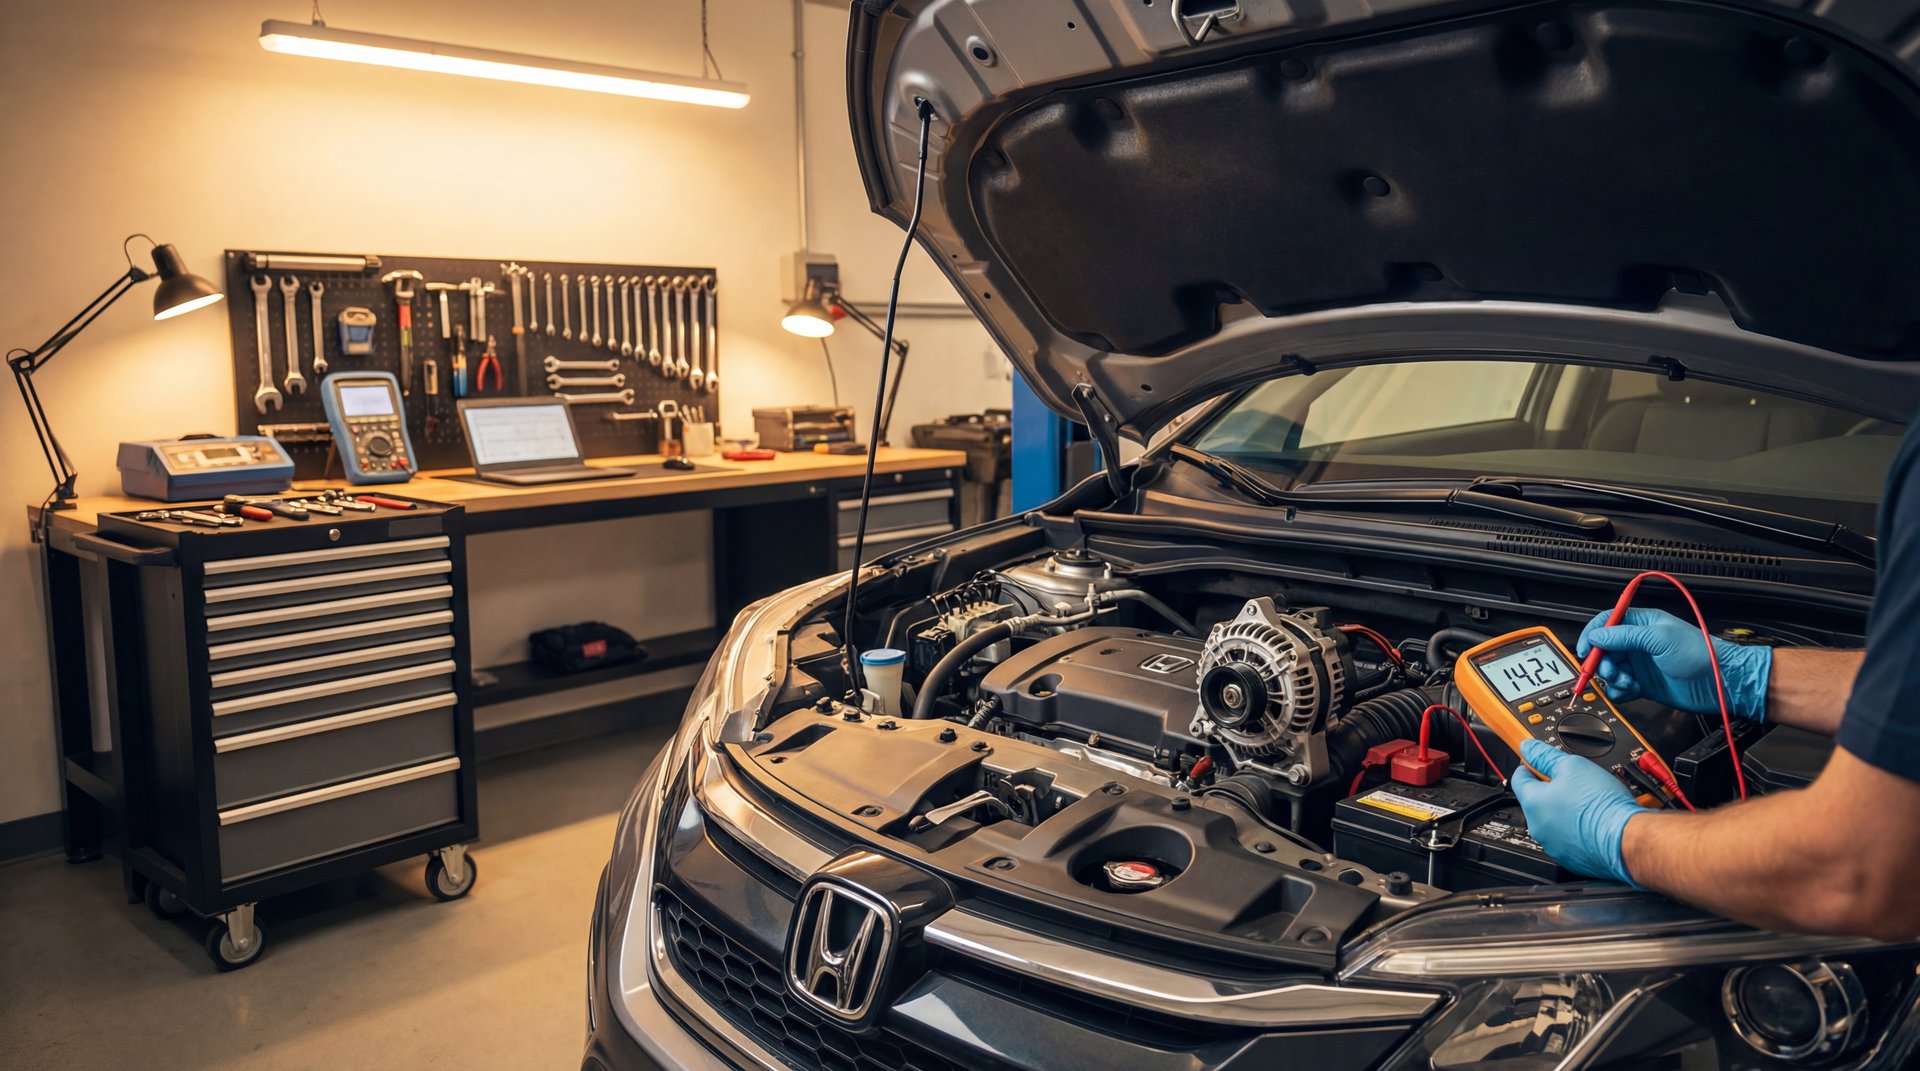
Alright, so if cleaning the terminals didn’t fix it, now we’re gonna actually test the charging system. For this, you’re gonna need a multimeter – you can pick up a basic one for about 20 bucks, and it’s one of those tools every DIYer should have in their toolbox.
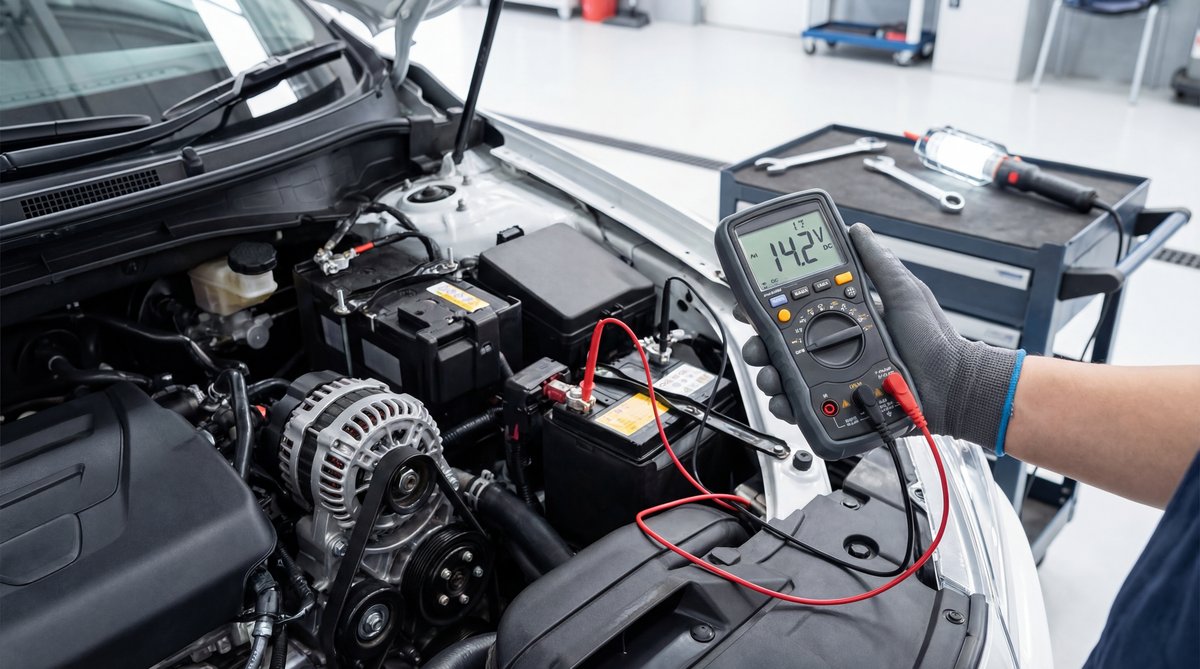
What we’re testing here is the voltage at the battery. Your battery should read between 12.4 and 12.8 volts with the engine off. That tells you the battery has a good charge. If it’s reading below 12.4 volts, your battery might be discharged or going bad.
Now here’s the important part – start the engine and check the voltage again. With the engine running, you should see between 13.8 and 14.5 volts. This is your alternator doing its job, charging the battery. If you’re still seeing 12.4 to 12.8 volts with the engine running, your alternator is not charging, and that’s your problem right there.
Test Condition
Expected Voltage
What It Means
Engine Off
12.4-12.8V
Battery is good
Engine Running (Idle)
13.8-14.5V
Alternator is charging
Engine Running (Below 13.8V)
12.4-12.8V
Alternator NOT charging
Some of you might see the voltage fluctuate a little bit – that’s normal, especially if you’re turning on accessories like the headlights or A/C. But it should stay in that 13.8 to 14.5 volt range. If it drops below 13.8 volts and stays there, you’ve got a charging problem.
❌ Common Mistake
Don’t just rev the engine and assume that if the voltage goes up, everything’s fine. You need to check it at idle too. A failing alternator might charge okay at higher RPMs but fail at idle, which is when you’ll notice that battery light coming on at stoplights.
Inspecting Ground Connections and Wiring
Alright, so let’s say your voltage test shows the alternator isn’t charging, but before you go buy a new alternator, we need to check something else – the ground connections. This is another area where a lot of DIYers mess up. They assume bad alternator and spend 400 bucks on a new one, when really they just had a bad ground connection.
Your Honda has what’s called a 301 ground – it’s basically where the negative battery cable connects to the chassis of the car. On a lot of Hondas, especially CR-Vs and Accords, this ground connection can get corroded or loose, and it’ll cause all sorts of electrical problems.
What we’re gonna do is trace that negative battery cable and find where it bolts to the body or engine block. Usually there’s a bolt holding it to the chassis somewhere near the battery. Check that connection – is it tight? Is there corrosion around it? Is the wire itself damaged?
🔧 Pro Tip
If you find a corroded ground, don’t just clean the outside. Unbolt it completely, use a wire brush to clean both the terminal and the metal it bolts to until you see shiny metal, then bolt it back down tight. A bad ground can cause no-start conditions, battery light issues, and even electrical fires in extreme cases.
You also want to check the main power wire going from the battery to the alternator. That’s usually a thick positive cable with a fuse or fusible link somewhere in the line. Make sure that connection at the alternator is tight and not corroded. I’ve seen cases where that connection was loose and it looked like a bad alternator, but tightening one bolt fixed everything.
When Your Alternator is Actually Bad
Okay, so you’ve cleaned your terminals, checked your grounds, tested your voltage, and you’re still showing 12.4 volts with the engine running instead of 13.8 to 14.5 volts. At this point, yeah, you probably have a bad alternator.
Here’s the thing about alternators – they don’t usually just die all at once. Usually you’ll get some warning signs before they completely fail. You might hear a whining or grinding noise coming from the alternator – that’s the bearings going bad. Or maybe you notice your headlights dimming at idle, or the battery light flickers on and off occasionally.
A lot of times people ignore those early warning signs until they’re stuck somewhere with a dead battery. Don’t be that person – if you’re noticing symptoms, test your charging system before you end up stranded.
Flat Rate Mechanic
Now, replacing an alternator on most Hondas isn’t too bad of a job. You’re looking at about 2 to 4 hours if you’re taking your time and doing it yourself. The alternator itself is gonna run you anywhere from $150 to $400 depending on if you go with a remanufactured unit or a new one.
$500-700
YOU SAVE
by doing this repair yourself vs. paying shop labor rates
If you take it to a shop, you’re looking at $500 to $900 total for parts and labor. Most shops charge between $120 and $150 an hour, and they’ll usually quote you 2 to 4 hours of labor depending on the model. So basically you’re saving yourself a few hundred bucks by doing it yourself.
💰 Money Saver
Before you buy a new alternator, check if your local auto parts store offers free alternator testing. A lot of them will test it on the car for free. Also, most remanufactured alternators come with a lifetime warranty – that’s usually your best value unless you’re keeping the car long-term and want the peace of mind of a new unit.
Real quick on the belt – while you’re in there checking everything, take a look at your serpentine belt. If it’s cracked, glazed, or loose, it could be slipping on the alternator pulley and preventing it from charging properly. A belt is cheap – like 20 to 40 bucks – and if yours looks questionable, just replace it while you’re doing this diagnosis.
If you’re dealing with Honda electrical issues, it’s always good to eliminate the simple stuff first. And speaking of electrical problems, if you’ve ever wondered what happens with battery connections, check out what happens if you hook your battery up backwards – it’s not pretty.
For more detailed info on battery light issues, I’ve got another article on why your battery light might be on even when the alternator tests good. That one covers some of the weirder cases I’ve seen over the years.
Frequently Asked Questions
What are the most common mistakes people make when trying to fix a Honda battery light issue?
The biggest mistake I see is people skipping the basics and going straight to replacing the alternator. Clean your battery terminals first – that solves the problem about half the time. The other common mistake is not checking the ground connections. That 301 ground on Hondas can get corroded and cause the exact same symptoms as a bad alternator. Always test your voltage with a multimeter before you start replacing parts.
How can I tell if my Honda’s alternator is failing?
The easiest way is with a voltage test. With the engine running at idle, you should see 13.8 to 14.5 volts at the battery. If you’re only seeing 12.4 to 12.8 volts, your alternator isn’t charging. Other symptoms include dimming headlights, a whining or grinding noise from the alternator, flickering dashboard lights, or accessories that aren’t working right. The battery light on your dash is obviously the main warning sign.
What tools are essential for diagnosing a battery charging issue in a Honda?
You really only need a few basic tools. A multimeter is the most important – you can get a decent one for about 20 bucks. You’ll also want a wire brush for cleaning terminals, a 10mm socket or wrench for disconnecting the battery, and some dielectric grease. Safety glasses are a good idea too. If you want to get fancy, a test light can help you check ground connections, but a multimeter will do everything you need for a basic diagnosis.
Are there any specific safety precautions I should take when working with a Honda’s electrical system?
Yeah, definitely. Always disconnect the negative battery terminal first when you’re working on electrical stuff – that prevents shorts and sparks. Wear safety glasses because battery acid and corrosion can splash up at you. Never test voltage with the engine running without your multimeter probes secured properly. And if you see white or green powder on your terminals, that’s corrosive – don’t touch it with bare hands. Also, never try to jump-start your car without checking the alternator first, because if the alternator’s bad, you’re just gonna drain the good battery too.
How much does it typically cost to replace a Honda alternator?
If you do it yourself, you’re looking at $150 to $400 for the alternator depending on whether you get a remanufactured or new unit. If you take it to a shop, expect to pay $500 to $900 total. That includes parts and labor – shops typically charge $120 to $150 per hour and the job takes about 2 to 4 hours depending on your model. So you’re saving yourself anywhere from $200 to $700 by doing it yourself. Before you buy anything though, make sure you’ve tested your charging system properly and ruled out simple stuff like corroded terminals.
Flat Rate Mechanic
Honda Battery Light on Not Charging? How to Test Charging System!