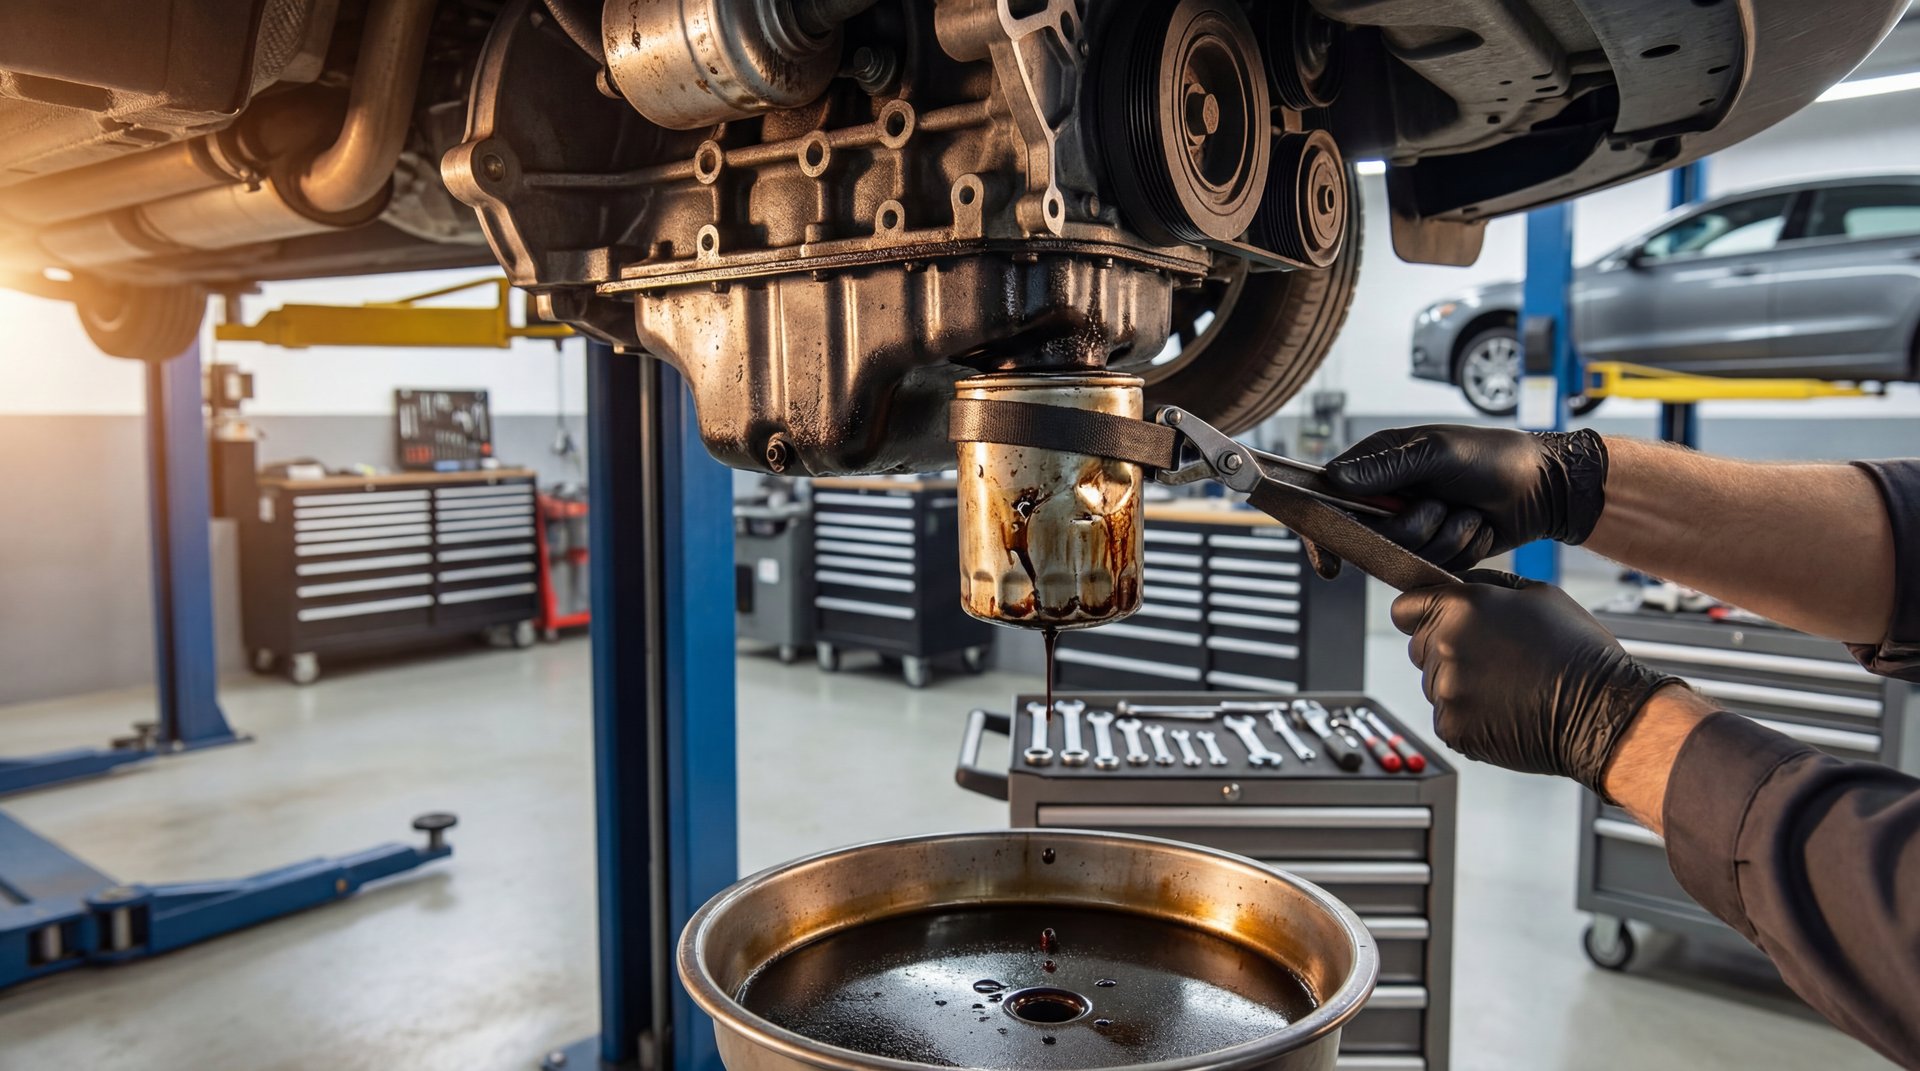
Alright guys, so I’ve seen a lot of oil change mishaps in my time, but this one really takes the cake. Customer rolled in for what should’ve been a simple oil change, but things went sideways real quick. The thing is, he tried doing it himself first and couldn’t get his oil filter off. And what did he do? He slapped JB Weld on it. Yeah, you heard that right. Now there’s oil sprayed everywhere, and we’ve got a mess on our hands. Let me break down what happened here and how you can avoid making the same mistake.
What Went Wrong With This Oil Change
So here’s what happened. Customer comes in, and I can already see oil all over the undercarriage. He admitted he tried doing his own oil change—which hey, I’m all for that—but he ran into trouble getting the oil filter off. Instead of stopping and figuring out the right approach, he decided to get creative with JB Weld.
Now, the thing is, when you can’t get an oil filter off, it’s usually because the last person overtightened it or the gasket seized to the housing. That’s actually pretty common. But putting JB Weld on it? That’s basically creating a pressurized oil bomb waiting to go off.
⚠️ Warning
Never use JB Weld, epoxy, or any kind of sealant on oil filters or drain plugs. When pressure builds up in the system, it can cause oil to spray violently when you finally get it loose. You’re looking at hot oil potentially hitting you in the face, which can cause serious burns or blindness. Always wear eye protection and gloves during oil changes.
When oil sprays everywhere like this, it’s not just messy—it’s dangerous. We’re talking about hot oil that can be 200+ degrees if the engine was recently running. Plus, you’ve now got a slippery floor, which is a hazard in itself.
Why JB Weld Makes Everything Worse
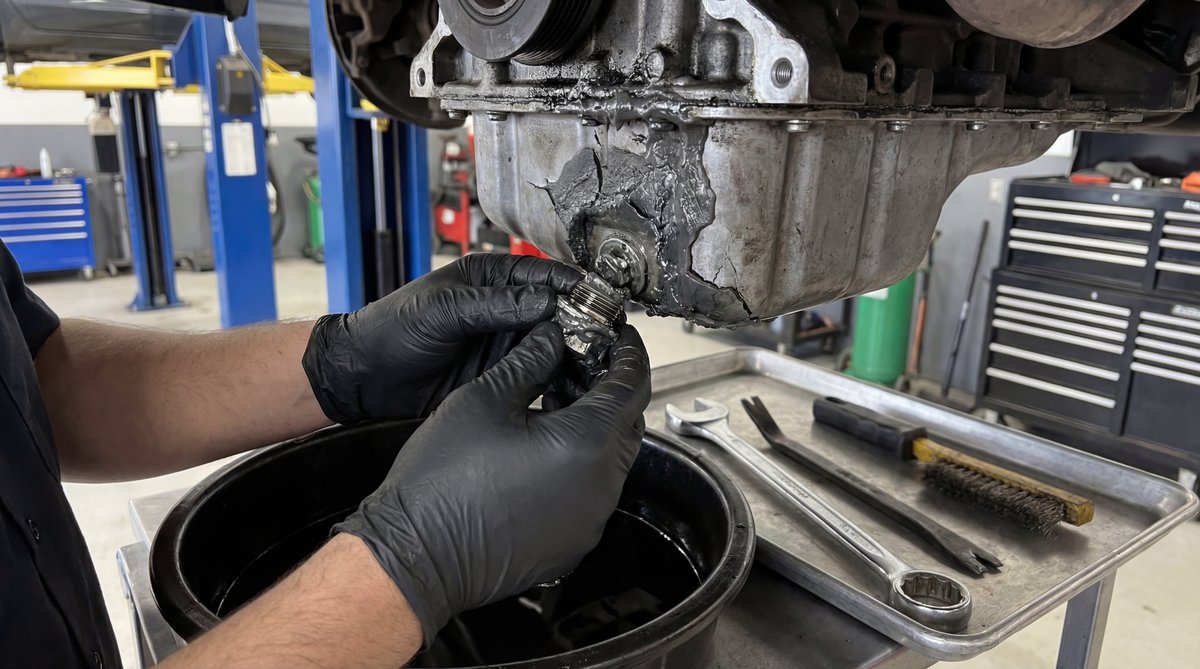
Alright, let’s talk about why reaching for JB Weld is basically the worst thing you can do in this situation. JB Weld is great for a lot of repairs—cracked housings, metal patches, stuff like that. But on something that needs to come off regularly? Big mistake.
What happens is the JB Weld seals everything up tight, but it also fills in the threads and creates an uneven, rock-hard surface. When you finally do get enough force to break it loose, all that pressure that’s been building up releases at once. That’s when you get the oil spray we saw on this vehicle.
❌ Common Mistake
Trying to use sealants or adhesives to deal with a stuck oil filter. This includes JB Weld, epoxy, thread locker, and even silicone. Oil filters are designed to seal with just the rubber gasket—that’s it. Adding anything else creates removal nightmares and potential safety hazards.
The other issue is that once you put JB Weld on there, you’ve probably damaged the threads on the housing or the mounting point. Now you’re looking at a way bigger repair than just replacing an oil filter. We’re talking potential engine block work or replacing the entire filter housing, which can run you several hundred bucks.
$500+
POTENTIAL REPAIR COST
if JB Weld damages the filter housing threads
The Right Way to Remove a Stuck Oil Filter
So what should you do when you’ve got a stuck oil filter? First thing, don’t panic and definitely don’t reach for the epoxy. There’s a proper way to handle this.
Start with the right tool. You need a proper oil filter wrench that fits your specific filter size. For most applications, you’re looking at something between 64mm and 76mm. Using pliers or vice grips just strips the canister and makes things worse.
If the filter still won’t budge with the proper wrench, here’s what we’re gonna do:
**Penetrating Oil Method:** Spray some good penetrating oil (I like PB Blaster or even ATF mixed with acetone) around the base of the filter where it meets the housing. Let it sit for 15-20 minutes. This gives it time to work into the threads and break down any corrosion or seized gasket material.
**Heat Application:** If penetrating oil doesn’t work, you can carefully apply heat to the filter housing with a heat gun or hairdryer. Don’t use a torch—you’re near oil and you don’t want to create a fire hazard. The gentle heat expands the metal slightly and can help break the seal.
🔧 Pro Tip
When using heat on a stuck filter, warm up the housing around the filter, not the filter itself. The housing will expand slightly and give you that little bit of extra clearance you need. Just be patient and don’t overdo it—5 minutes with a heat gun is usually plenty.
**Last Resort—Drive a Screwdriver Through It:** If you’re absolutely stuck and the filter’s already toast anyway, you can drive a long screwdriver or pry bar through the side of the filter canister and use it as a lever to twist it off. Yeah, it’s aggressive, but sometimes that’s what it takes. Just make sure you’ve got a drain pan ready because oil’s gonna come out.
How to Do an Oil Change Properly
Let me walk you through the right way to do an oil change so you don’t end up in this situation. The thing is, most oil change problems come from not following the basics.
🔧 Tools You’ll Need
Oil filter wrench (correct size for your filter)
Drain pan (at least 5-quart capacity)
Torque wrench (3/8″ drive, 10-30 ft-lbs range)
Socket set (15mm for most drain plugs, varies by vehicle)
Funnel for adding oil
Shop rags or paper towels
Safety glasses and gloves
**Step 1: Warm Up the Engine**
Run your engine for about 5 minutes to warm up the oil—warm oil drains faster and more completely. But don’t run it too long; you want it warm, not scalding hot. Then let it sit for a few minutes to cool down just enough to be safe.
**Step 2: Drain the Old Oil**
Position your drain pan under the drain plug. Most vehicles use a 15mm socket, but some (like certain Polaris models) use a 6mm Allen key. Loosen it slowly—when you get to the last few threads, be ready for oil to start flowing. Let it drain completely, which usually takes about 10 minutes.
**Step 3: Remove the Old Filter**
Here’s where people mess up. Use your oil filter wrench and turn it counterclockwise. It should come off without crazy force. If it doesn’t, see my section above about removing stuck filters. Never force it to the point where you’re thinking about JB Weld.
**Step 4: Prep the New Filter**
This is critical. Take fresh oil and coat the rubber gasket on your new filter. This helps it seal properly and makes it way easier to remove next time. Hand-tighten the filter until the gasket makes contact with the housing, then give it about 3/4 of a turn more. That’s it. You don’t need tools to install it.
🔧 Pro Tip
Before installing your new filter, wipe down the filter mounting surface on the engine with a clean rag. Sometimes the old gasket sticks to the housing, and if you install the new filter over it, you’ll have double gaskets and oil leaks everywhere. Check out our guide on checking your oil level properly after the change.
**Step 5: Replace the Drain Plug**
Put a new crush washer on your drain plug—these cost like $1-2 and they’re critical for a good seal. According to manufacturer torque specifications, most drain plugs should be torqued to around 25-30 ft-lbs, but this varies. Aluminum oil pans (like on newer Chevy Trax models) need way less—only about 10 ft-lbs. Over-tighten an aluminum pan and you’ll strip it out.
**Step 6: Add New Oil**
Check your owner’s manual for the right amount. Most cars take 4-5 quarts, but it varies. Add about 3/4 of the recommended amount first, then start the engine and let it run for a minute. Shut it off, wait a couple minutes, then check the dipstick and top off as needed.
DIY Cost
Shop Cost
You Save
$30-65
$130-240
$100+
Avoiding the Most Common Oil Change Mistakes
Let me break down the most common screw-ups I see with oil changes, because the thing is, most of these are totally preventable.
**Mistake #1: Over-Tightening the Filter**
Guys will crank down on that oil filter with a wrench thinking they’re preventing leaks. All you’re doing is making it impossible to remove next time and potentially crushing the gasket, which actually makes it more likely to leak. Hand-tight plus 3/4 turn—that’s all you need.
**Mistake #2: Reusing the Crush Washer**
I see this all the time. People think they can save a buck by reusing the old drain plug washer. That washer is designed to crush once and create a seal. After that, it’s done. Shell out the $2 for a new one. Trust me on this.
💰 Money Saver
Buy your oil and filters in bulk online. You can get oil change kits with the filter, oil, and crush washer for $25-50 depending on your vehicle. That’s way cheaper than buying everything separately at the auto parts store, and you’ll always have supplies on hand. If you’re working on a Subaru, check out our detailed guide on avoiding common Subaru oil change mistakes.
**Mistake #3: Using the Wrong Torque Specs**
Not all drain plugs are created equal. Steel oil pans can handle 30 ft-lbs no problem. But newer vehicles with aluminum pans? You might need as little as 10-12 ft-lbs. Check your manual or look it up online. Over-torque an aluminum pan and you’ll strip the threads, which means you’re looking at a helicoil repair or a new pan.
**Mistake #4: Not Checking for Leaks After**
Do the oil change, start the car, and immediately look underneath. Let it run for a minute and check again. Way better to catch a leak in your driveway than on the highway. If you see drips, shut it down and investigate.
**Mistake #5: Cheap Filters on High-Performance Engines**
Look, I’m all for saving money, but don’t cheap out on filters if you’ve got a turbocharged engine or something high-performance. Those $5 filters with cardboard end caps? They’re fine for a basic commuter car. But for anything working harder, spend the extra $10 and get a quality synthetic filter like Mobil 1 or Fram Ultra.
The difference between a $30 DIY oil change and a $200 shop visit isn’t just money—it’s understanding what you’re doing and why. Take your time, use the right tools, and never try to fix a stuck filter with JB Weld.
Flat Rate Mechanic
**Disposing of Your Used Oil**
Real quick on disposal—don’t dump used oil down the drain or in your yard. That’s illegal basically everywhere and terrible for the environment. Most auto parts stores (AutoZone, O’Reilly, Advance Auto) take used oil for free. Just pour it into a sealed container and bring it in. They’ll also take your used filter.
When you’re looking at DIY oil changes, you’re saving $100-175 every time compared to a shop. Do that four times a year and you’re looking at $400-700 in your pocket. That’s real money. But you gotta do it right, or you’ll end up like this customer with oil sprayed everywhere and a repair bill that’s way worse than just paying for the oil change in the first place.
Frequently Asked Questions
What are the most common mistakes people make during an oil change?
The biggest ones I see are over-tightening the oil filter (hand-tight plus 3/4 turn is all you need), reusing old crush washers on the drain plug, and not using the correct torque specs—especially on aluminum oil pans which strip easily. Another common one is not lubricating the new filter gasket with fresh oil before installing it, which makes it harder to remove next time and can cause leaks.
How can I ensure I’m using the correct torque specification for my oil filter?
First, check your vehicle’s service manual—that’s always your best source. If you don’t have that, look it up online using your specific year, make, and model. For most cartridge-style filters with a housing cap, you’re looking at around 18-20 ft-lbs (25 Nm). For drain plugs, steel pans typically take 25-30 ft-lbs, but aluminum pans might only need 10-14 ft-lbs. When in doubt, start lower and work up—you can always tighten more, but you can’t un-strip threads.
What safety equipment should I always have on hand for an oil change?
At minimum, you need safety glasses and gloves—hot oil can cause serious burns and blindness if it gets in your eyes. I also recommend long sleeves to protect your arms. Use a good drain pan that holds at least 5 quarts to contain all the oil, and have plenty of rags handy. If you’re working on a vehicle that was recently running, give it 30-60 minutes to cool down before you start. Hot oil is no joke.
Are there any specific brands of oil filters that are recommended for better performance?
For most applications, OEM filters are a solid choice—they’re designed specifically for your vehicle. If you want to upgrade, Mobil 1 and Fram Ultra Synthetic are both good quality filters with metal end caps and better filtration. Avoid the super cheap filters (under $5) if you have a turbocharged or high-performance engine—those cardboard end caps can fail under high pressure. For regular commuter cars, though, a mid-range filter ($8-12) is perfectly fine as long as you’re changing your oil on schedule.
How do I properly dispose of used oil and filters?
Never dump used oil down drains, in your yard, or in the trash—it’s illegal and horrible for the environment. Instead, pour your used oil into a sealed container (I reuse the empty bottles from the new oil) and take it to any auto parts store like AutoZone, O’Reilly, or Advance Auto. They take used oil and filters for free, no questions asked. Some municipal recycling centers also accept used oil. Just call ahead to confirm. It takes like 5 extra minutes and keeps nasty chemicals out of the groundwater.