“`html
How to Fix BMW Coolant Pump Fault Code 20A804: Complete Diagnostic and Repair Guide
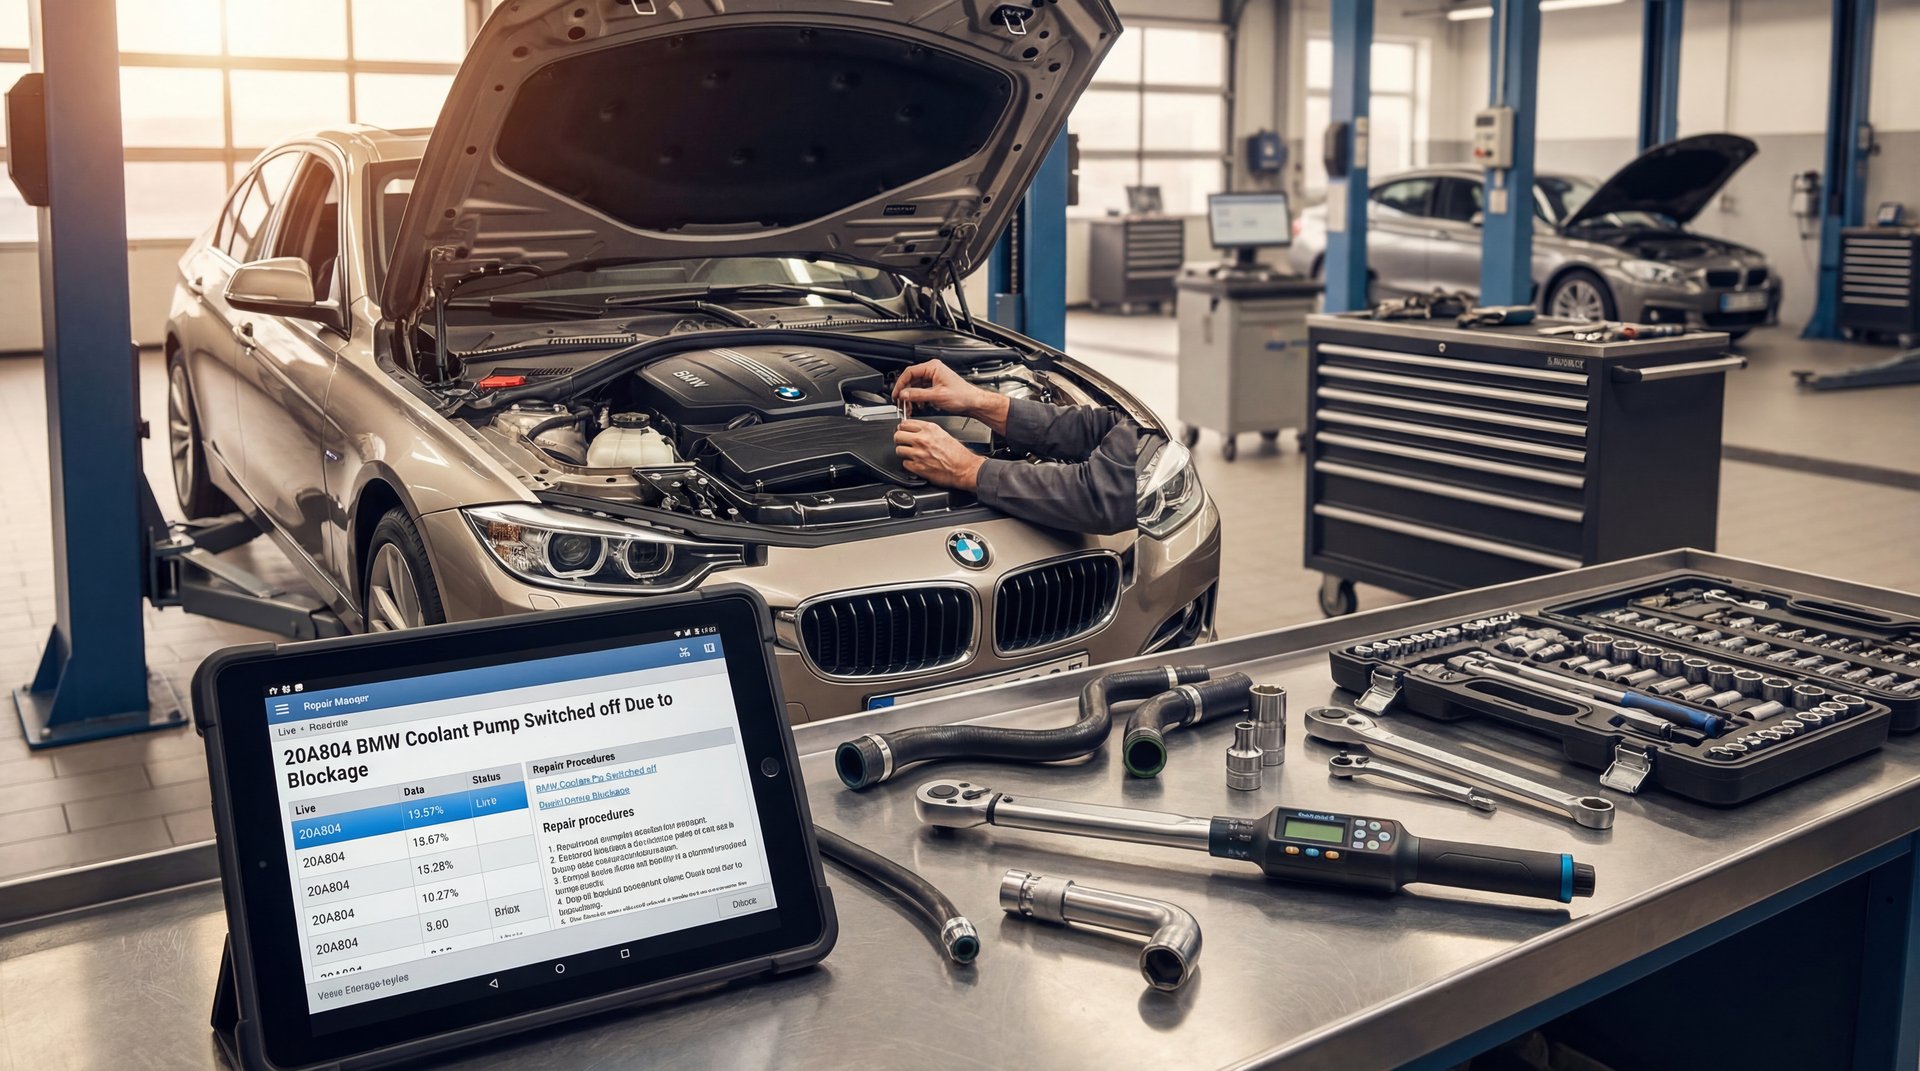
Alright guys, so you’ve got your BMW throwing a check engine light and you’re seeing fault code 20A804 – “Engine cooling system coolant pump switched off due to blockage.” Not exactly what you want to see on your dashboard, right? The thing is, this code is basically your BMW’s computer telling you that the electric water pump is having a bad day, and the system has shut it down to prevent damaging the electrical circuit. In this comprehensive guide, we’re gonna go over everything you need to know about diagnosing and fixing this issue, from what the code really means to how to test your water pump and what it’s gonna cost you to fix it right.
What Does Fault Code 20A804 Really Mean?
Let me break this down for you in plain English. When you see diagnostic trouble code 20A804, what’s happening is that your BMW’s electronic control module (ECM) has detected that the electric water pump is drawing abnormal current or binding up. Basically, the pump is either physically blocked, the impeller is damaged and catching on something, or the internal motor has started to fail and is binding up. When the computer sees this happening, it shuts off power to the pump to prevent a short circuit or electrical fire.
Now here’s the thing – you might also see this code paired with 20A701, which is another coolant-related fault code. When you see both codes together, it’s typically confirming that you’ve got a water pump issue that’s affecting the entire cooling system operation. The customer concern that usually comes with these codes is pretty consistent: check engine light on, and often an “engine overheating” message on the dash display.
Understanding BMW’s Electric Water Pump System
Real quick, let me explain why BMWs use electric water pumps instead of the traditional belt-driven pumps you might be used to. Modern BMWs switched to electric water pumps because they allow the engine computer to precisely control coolant flow based on engine temperature and load. This improves fuel economy, reduces emissions, and allows for better thermal management. The downside? When these pumps fail, they fail completely – there’s no belt turning them, so if the pump quits, your coolant stops circulating immediately.
The electric water pump is controlled through something called the Bit Serial Data Bus (BSD), which is basically how the engine computer communicates with the pump. The pump receives power through multiple wires: a large red wire (pin 3) that provides battery voltage, a small red/green wire (pin 1) for additional power supply, a large brown wire (pin 4) for ground, and a small violet wire (pin 2) that carries the BSD communication signal. Understanding this wiring is critical for proper diagnosis.
Proper Diagnostic Procedures for Code 20A804
Alright guys, so before you just throw a new water pump at this problem, we’re gonna do this right and actually test the system. I’ve seen too many DIYers replace a perfectly good pump when the real issue was a wiring problem or a blown fuse. Here’s what we’re gonna do, step by step:
Step 1: Verify Power Supply to the Water Pump
First thing you need to do is test for battery voltage at the electric water pump connector. With the key in the on position (engine off), you should have battery voltage on the large red wire (pin 3) and the small red/green wire (pin 1). Now here’s the important part – you can’t just use a regular multimeter for this test. You need to test it in a loaded state, which means using a sealed beam headlight bulb as your test light. This puts about a 4-amp load on the circuit, and the bulb should light up just as bright as if you connected it directly to the battery. If the bulb is dim or doesn’t light at all, you’ve got a power supply issue, not a bad pump.
Step 2: Test the Ground Circuit
Next up, test the large brown wire (pin 4) for a good ground. Again, you want to test this loaded – connect your headlight bulb test light between the brown wire and battery positive. The bulb should light up bright, indicating a solid ground path. A dim bulb or no light means you’ve got a ground issue that needs to be traced and repaired before replacing the pump.
Step 3: Check the Communication Signal (Advanced)
The small violet wire (pin 2) is the BSD communication line, and honestly guys, this one can only be properly tested with a lab scope. You should see a 7 to 12 volt square wave pattern on this line. If you don’t have access to a lab scope, this is where you might need to take it to a shop with the proper diagnostic equipment. But if your power and ground tested good, chances are the communication line is fine and the pump itself is the problem.
Step 4: Perform the Coolant System Bleed Procedure
Here’s something a lot of people don’t know – BMW has a specific bleed procedure that actually runs the coolant pump for 12 minutes, and you can use this as a functional test. Here’s what you’re gonna do:
- Insert the key into the holder and push the start button with your foot OFF the brake (so the engine won’t start)
- Turn the heat temp to high and the blower to low
- Press the accelerator pedal to the floor and hold it for a 10 count
- The coolant pump should kick on and run for 12 minutes
- Make sure the coolant fill cap is on tight during this procedure
- Have a battery charger connected – this procedure draws a lot of power
If your wiring tests correctly but the pump doesn’t run during this bleed operation, congratulations – you’ve confirmed you need a new water pump.
Common Causes of Electric Water Pump Failure in BMWs
Now let’s talk about why these pumps fail in the first place. The thing is, there are several common failure modes I see all the time on these BMWs:
Internal Bearing Failure
The most common issue is internal bearing failure in the pump motor. Over time, the bearings wear out and the motor shaft starts to bind. When this happens, the motor draws excessive current trying to turn the impeller, and the ECM sees this as a blockage or short circuit condition and shuts the pump down. On most BMWs, these pumps start failing between 60,000 and 100,000 miles – the average reported mileage for this issue is around 61,500 miles.
Coolant Contamination
Here’s something critical – BMW requires you to use only BMW-approved coolant in these systems. Using the wrong coolant can cause deposits to form inside the pump housing, literally creating a physical blockage that prevents the impeller from spinning freely. I’ve pulled pumps apart and found them completely clogged with crystallized coolant deposits because someone used cheap universal coolant instead of the proper BMW coolant. Don’t be that guy.
Electrical Control Module Failure
The pump itself has an integrated control module that can fail independently of the mechanical components. When this happens, the pump might receive proper power and ground, but the internal electronics can’t properly control the motor. This usually sets the 20A804 code because the ECM sees erratic current draw from the pump.
Physical Debris in the Cooling System
Sometimes actual physical blockage is the culprit – I’ve seen everything from deteriorated hose material to manufacturing flash from other cooling system components get sucked into the pump and jam the impeller. This is why it’s important to flush the cooling system when replacing the pump.
Tools and Parts You’ll Need for the Repair
Alright guys, let’s go over what you’re gonna need to tackle this job. The thing is, BMW made this repair relatively straightforward on most models, but you do need some specific tools:
Essential Tools
- Socket set: Including 10mm, 13mm, and 16mm sockets – most of the bolts are these sizes
- Torx bit set: Specifically T30 Torx – several bolts use this size
- Torque wrench: Critical for proper installation – you need to torque the pump bolts to 10 Nm (89 inch-pounds)
- Coolant drain pan: You’ll be draining at least 2 gallons of coolant
- Funnel: For refilling the coolant system
- Sealed beam headlight bulb: For loaded circuit testing as I explained earlier
- Multimeter or test light: For electrical diagnostics
- Battery charger: For the bleed procedure and to maintain voltage during the repair
Parts You’ll Need
- Electric water pump: OEM BMW or quality aftermarket (expect to pay $300-$500 for OEM, $150-$300 for aftermarket)
- BMW-approved coolant: You’ll need about 3 gallons total – use either BMW Blue coolant or the approved orange extended-life coolant depending on your model year (around $20-$30 per gallon)
- Distilled water: For mixing with concentrate coolant (about $1 per gallon)
- New aluminum bolts: BMW specifies that ALL aluminum bolts must be replaced – they’re one-time-use (usually come with the pump or available separately)
- O-rings and gaskets: Usually included with the pump, but verify before starting the job
Step-by-Step Water Pump Replacement Tips
Now I’m not gonna give you a complete step-by-step here because that varies significantly between BMW models – what works on an E90 3-Series is different from an F10 5-Series. But I will give you the critical tips that apply across the board, the stuff that’ll save you from doing this job twice:
Before You Start
Pro Tip #1: Take pictures of everything before you disconnect it. Seriously guys, I can’t stress this enough. The routing of hoses, the position of brackets, wire harness clips – photograph all of it from multiple angles. You’ll thank me later when you’re reassembling and can’t remember where that one bracket went.
Pro Tip #2: Let the engine cool completely before starting. I know you’re eager to get going, but coolant under pressure can be above 200°F and will absolutely send you to the emergency room. Wait at least 4 hours after the engine was running, preferably overnight.
During Removal
Pro Tip #3: When you drain the coolant, catch it in a clean container if it’s not contaminated. You might be able to reuse it if it’s relatively fresh and clean, which saves you money. But honestly, if you’re not sure about the condition or age of your coolant, just replace it all – it’s cheap insurance.
Pro Tip #4: Inspect all the coolant hoses while you’ve got access. If you see any hoses that are soft, squishy, cracked, or hardened, replace them now. The last thing you want is to button everything up with a new pump and then have a hose fail a week later, forcing you to drain the system again.
During Installation
Pro Tip #5: Clean the mating surfaces thoroughly before installing the new pump. Use a plastic scraper – never use metal scrapers or abrasive pads on aluminum surfaces. Any old gasket material or debris left behind can cause leaks. I like to wipe the surfaces down with brake cleaner after scraping.
Pro Tip #6: When installing the new pump, hand-thread all the bolts first before tightening any of them. This ensures the pump is properly aligned and prevents cross-threading. Then tighten them in a star pattern to the specified torque of 10 Nm. Don’t just run them down with an impact gun – these are aluminum bolts going into aluminum housings, and it’s real easy to strip the threads.
Pro Tip #7: Before connecting the electrical connector, inspect it carefully for corrosion or damaged pins. If you see any green corrosion, clean it with electrical contact cleaner. Damaged pins should be replaced – a bad electrical connection will cause your new pump to fail prematurely.
After Installation and Bleeding
Pro Tip #8: After you’ve filled the system and run the bleed procedure, start the engine and let it warm up to operating temperature while monitoring the coolant level. You’ll likely need to add more coolant as air pockets work their way out. Keep the heat on high during this process.
Pro Tip #9: Check for leaks around all connection points while the engine is warming up. A small weep that you might not notice when cold can turn into a significant leak at operating temperature and pressure. If you see any leaks, shut the engine down immediately and address them.
Pro Tip #10: After your first test drive, check the coolant level again when the engine is cold. Top it off if necessary. Also check again after a day or two of driving – it’s normal to need to add a little more as the last of the air bleeds out of the system.
Critical Safety Warnings
Real quick, we need to talk about safety because this repair involves some serious hazards:
⚠️ HOT COOLANT WARNING: Never open the cooling system when the engine is hot. The coolant is under pressure and can be above the boiling point. Opening the cap or disconnecting hoses can cause superheated coolant to spray out, causing severe burns. Always let the engine cool completely – at least 4 hours, preferably overnight.
⚠️ ELECTRICAL SAFETY: Always disconnect the negative battery cable before disconnecting the water pump electrical connector or doing any electrical testing. The pump draws significant current, and a short circuit can cause sparks, burns, or electrical fire.
⚠️ COOLANT TOXICITY: Ethylene glycol coolant is highly toxic to humans and animals, and it has a sweet taste that attracts pets and children. Always clean up any spills immediately, store coolant in labeled containers, and dispose of old coolant properly at a recycling center – never pour it down drains or into the ground.
⚠️ LIFTING HAZARDS: If you need to raise the vehicle to access the water pump, always use jack stands rated for the vehicle’s weight. Never work under a vehicle supported only by a floor jack – they can fail without warning. Place the jack stands on the proper lift points specified in your owner’s manual.
Common Mistakes to Avoid
Let me tell you about the mistakes I see DIYers make all the time with this repair, so you don’t have to learn the hard way:
Mistake #1: Not replacing aluminum bolts. BMW specifies that aluminum bolts are one-time-use and must be replaced. I know they look fine, but reusing them can result in the bolts stretching and the pump working loose over time, causing leaks or complete pump detachment. Don’t cheap out here – new bolts cost a few dollars.
Mistake #2: Using the wrong coolant. This is huge, guys. BMW cooling systems require BMW-approved coolant with specific anti-corrosion additives. Using generic “universal” coolant can cause corrosion of aluminum components, formation of deposits that block passages, and premature pump failure. Yes, BMW coolant is more expensive, but it’s formulated specifically for their aluminum-intensive cooling systems.
Mistake #3: Not properly bleeding the system. Air trapped in the cooling system can cause localized hot spots, improper temperature readings, and pump cavitation. Follow the proper bleed procedure I outlined earlier. Don’t just fill it and call it good – you need to run the pump bleed cycle and then heat cycle the engine while monitoring the coolant level.
Mistake #4: Replacing the pump without diagnosing. I’ve seen people throw $500 at a new pump when the real problem was a $5 blown fuse or a corroded connector. Always perform proper diagnosis first. Test your power, ground, and communication circuits before condemning the pump.
Mistake #5: Over-torquing bolts. More is not better when it comes to bolt torque, especially on aluminum. The specified torque is 10 Nm (89 inch-pounds) for most BMW water pump applications. Over-torquing can strip threads in the aluminum block or crack the pump housing. Use a torque wrench and follow the specs.
Mistake #6: Not checking for related failures. While you’ve got the cooling system apart, inspect the thermostat, hoses, expansion tank, and radiator. These components often fail around the same mileage as the water pump. Finding a cracked expansion tank after you’ve buttoned everything up is a real bummer.
Cost Analysis: DIY vs. Professional Repair
Alright guys, let’s talk money. Here’s what you’re looking at for this repair:
DIY Cost Breakdown
- OEM BMW electric water pump: $300-$500
- Quality aftermarket pump: $150-$300
- BMW-approved coolant (3 gallons): $60-$90
- Aluminum replacement bolts (if not included): $10-$20
- Miscellaneous supplies (gaskets, hose clamps if needed): $10-$30
- Total DIY cost: $230-$640 depending on parts choices
Professional Shop Cost
- Parts: $400-$600 (shops typically use OEM)
- Labor: 2.5-4.0 hours at $100-$150/hour = $250-$600
- Shop supplies and coolant: $50-$100
- Total shop cost: $700-$1,300
So basically, you’re looking at saving $500-$700 by doing this yourself, assuming you already have the basic tools. That’s significant savings, but keep in mind this assumes everything goes smoothly. If you run into complications, stripped bolts, or discover additional problems, those savings can evaporate quickly.
The thing is, this job is definitely within the capabilities of an intermediate-level DIYer who’s comfortable with basic mechanical work and has a few hours to dedicate to it. If you’ve successfully done timing belt jobs, suspension work, or other cooling system repairs, you can handle this. But if you’ve never worked on a cooling system before, this might not be the best learning project – one mistake with the cooling system can lead to catastrophic engine damage from overheating.
When to Consider Professional Help
Look, I’m all about DIY repairs and saving money, but there are times when taking it to a pro makes more sense:
Consider professional help if:
- You don’t have the proper diagnostic tools to confirm the pump is actually the problem
- Your car is still under warranty or extended warranty (DIY repairs can void coverage)
- You discover damaged wiring or corrosion in the electrical connector that requires repair
- You find multiple cooling system components that need replacement (might be more cost-effective to let a shop handle the entire job)
- You’re not comfortable working with hot coolant systems or electrical components
- You don’t have a clean, well-lit workspace and proper tools
- You need the car back on the road immediately (shops can often complete this repair in a day)
Related Repairs and Preventive Maintenance
While you’re in there replacing the water pump, there are several related components you should seriously consider addressing at the same time:
Coolant Expansion Tank
The plastic expansion tank commonly fails around the same mileage as the water pump. If yours has any cracks, is discolored, or shows signs of seepage, replace it now. They cost $50-$100 and take an extra 15 minutes to swap while you’ve already got the system drained. Trust me, you don’t want to do this job twice because the expansion tank splits a month after you replaced the pump.
Radiator Hoses and Heater Hoses
Inspect all coolant hoses carefully. Look for cracks, soft spots, bulges, or hardening. If any hoses are original and the car has over 80,000 miles, consider replacing them preventively. Upper and lower radiator hoses typically run $30-$60 each. Heater hoses are usually cheaper at $15-$30 each.
Thermostat
On some BMW models, the thermostat is integrated with the water pump housing. On others, it’s a separate component. If yours is separate and hasn’t been replaced, consider doing it now while the coolant is drained. A failing thermostat can cause the same overheating symptoms as a bad water pump. Cost is typically $50-$150 depending on the model.
Cooling System Flush
If the coolant in your system is more than 4 years old or looks contaminated, do a complete flush before refilling. This removes old deposits, rust, and contamination that could damage your new pump. You can do this with a garden hose while the old pump is out – just flush water through the system until it runs clear.
Long-Term Prevention and Maintenance
Here’s how to keep your cooling system healthy and potentially avoid premature water pump failure in the future:
1. Use only BMW-approved coolant: I can’t stress this enough. The few extra dollars you spend on proper coolant will save you hundreds in premature component failure. BMW Blue coolant (older models) or BMW Orange coolant (newer models) are formulated specifically for their aluminum-intensive engines.
2. Follow the coolant change intervals: BMW typically recommends coolant changes every 4 years or 50,000 miles, whichever comes first. Don’t skip this maintenance – old coolant loses its anti-corrosion properties and can damage components.
3. Address cooling system leaks immediately: Even a small leak that only loses a little coolant can introduce air into the system, which causes hot spots and pump cavitation. If you’re adding coolant regularly, find and fix the leak.
4. Watch your temperature gauge: